

Python
⏱ 60 minutes build time || GithHub Repo Telnyx IVR demo built on Voice API V2 and Python with Flask and Ngrok. In this tutorial, you’ll learn how to:- Set up your development environment to use the Telnyx Voice API using Python and Flask.
- Build a find me/follow me based app via IVR on the Telnyx Voice API using Python.
- Prerequisites
- Telnyx Voice API Basics
- Call Commands
- Client State
- Building the IVR
- Creating the IVR
- Answering the Incoming Call
- Presenting Options
- Interpreting Button Presses
Prerequisites for building an IVR with Python
This tutorial assumes you’ve already set up your developer account and environment and you know how to send commands and receive webhooks using the Telnyx Voice API. You’ll also need to havepython installed to continue. You can check this by running the following:
After pasting the above content, Kindly check and remove any new line added
After pasting the above content, Kindly check and remove any new line added
Telnyx Voice API basics
For the Voice API application you’ll need to get a set of basic functions to perform Telnyx Voice API Commands. The below list of commands are just a few of the available commands available with the Telnyx Python SDK. We will be using a combination of Answer, Speak, and Gather Using Audio to create a base to support user interaction over the phone.- Voice API Bridge Calls
- Voice API Dial
- Voice API Speak Text
- Voice API Gather Using Speak
- Voice API Hangup
- Voice API Recording Start
telnyx, so make sure you have it installed. If not you can install it with the following command:
After pasting the above content, Kindly check and remove any new line added
After pasting the above content, Kindly check and remove any new line added
After pasting the above content, Kindly check and remove any new line added
| Variable | Description |
TELNYX_API_KEY | Your Telnyx API Key |
TELNYX_PUBLIC_KEY | Your Telnyx Public Key |
.env file
This app uses the excellent python-dotenv package to manage environment variables. Make a copy of.env.sample and save as .env 📁 in the root directory and update the variables to match your creds.
After pasting the above content, Kindly check and remove any new line added
load_dotenv() function to set the environment variables.
After pasting the above content, Kindly check and remove any new line added
Server and Webhook setup
Flask is a great application for setting up local servers. However, in order to make our code public to be able to receive webhooks from Telnyx, we are going to need to use a tool called ngrok. Installation instructions can be found here. Now to begin our flask application, underneath the import and setup lines detailed above, we will add the following:After pasting the above content, Kindly check and remove any new line added
After pasting the above content, Kindly check and remove any new line added
After pasting the above content, Kindly check and remove any new line added
After pasting the above content, Kindly check and remove any new line added
After pasting the above content, Kindly check and remove any new line added
Receiving and interpreting webhooks
We will be configuring our respond function to handle certain incoming webhooks and execute call control commands based on what the values are. Flask catches the incoming webhooks and calls the respond() function every time a webhook is sent to the route we specified as ‘/webhook’. We can see the json value of the hook in the request.json object. Here is what a basic Telnyx Call Object looks likeAfter pasting the above content, Kindly check and remove any new line added
After pasting the above content, Kindly check and remove any new line added
After pasting the above content, Kindly check and remove any new line added
Call commands
A full reference to the call commands in every Telnyx SDK available can be found hereClient state
Client State: within some of the Telnyx Voice API Commands list we presented, you probably noticed we were including the Client State parameter. Client State is the key to ensure that we can perform functions only when very specific conditions are met on our App while consuming the same Voice API Events.
Because the Telnyx Voice API is stateless and async your application will be receiving several events of the same type, e.g. user just included DTMF. With Client State you enforce a unique ID to be sent back to Telnyx which be used within a particular Command flow and identifying it as being at a specific place in the call flow.
This app in particular will ask the user to make a selection from various Weather stations in the US. Upon their selection, they will be transfered to the city of choice.
The client_state is particularly useful during the transfer, as the outbound leg of the call will also emit status updates to the same endpoint as the inbound call.
Setting a value to the client_state will allow us to check the direction of the call for the gather IVR logic.
Building the IVR
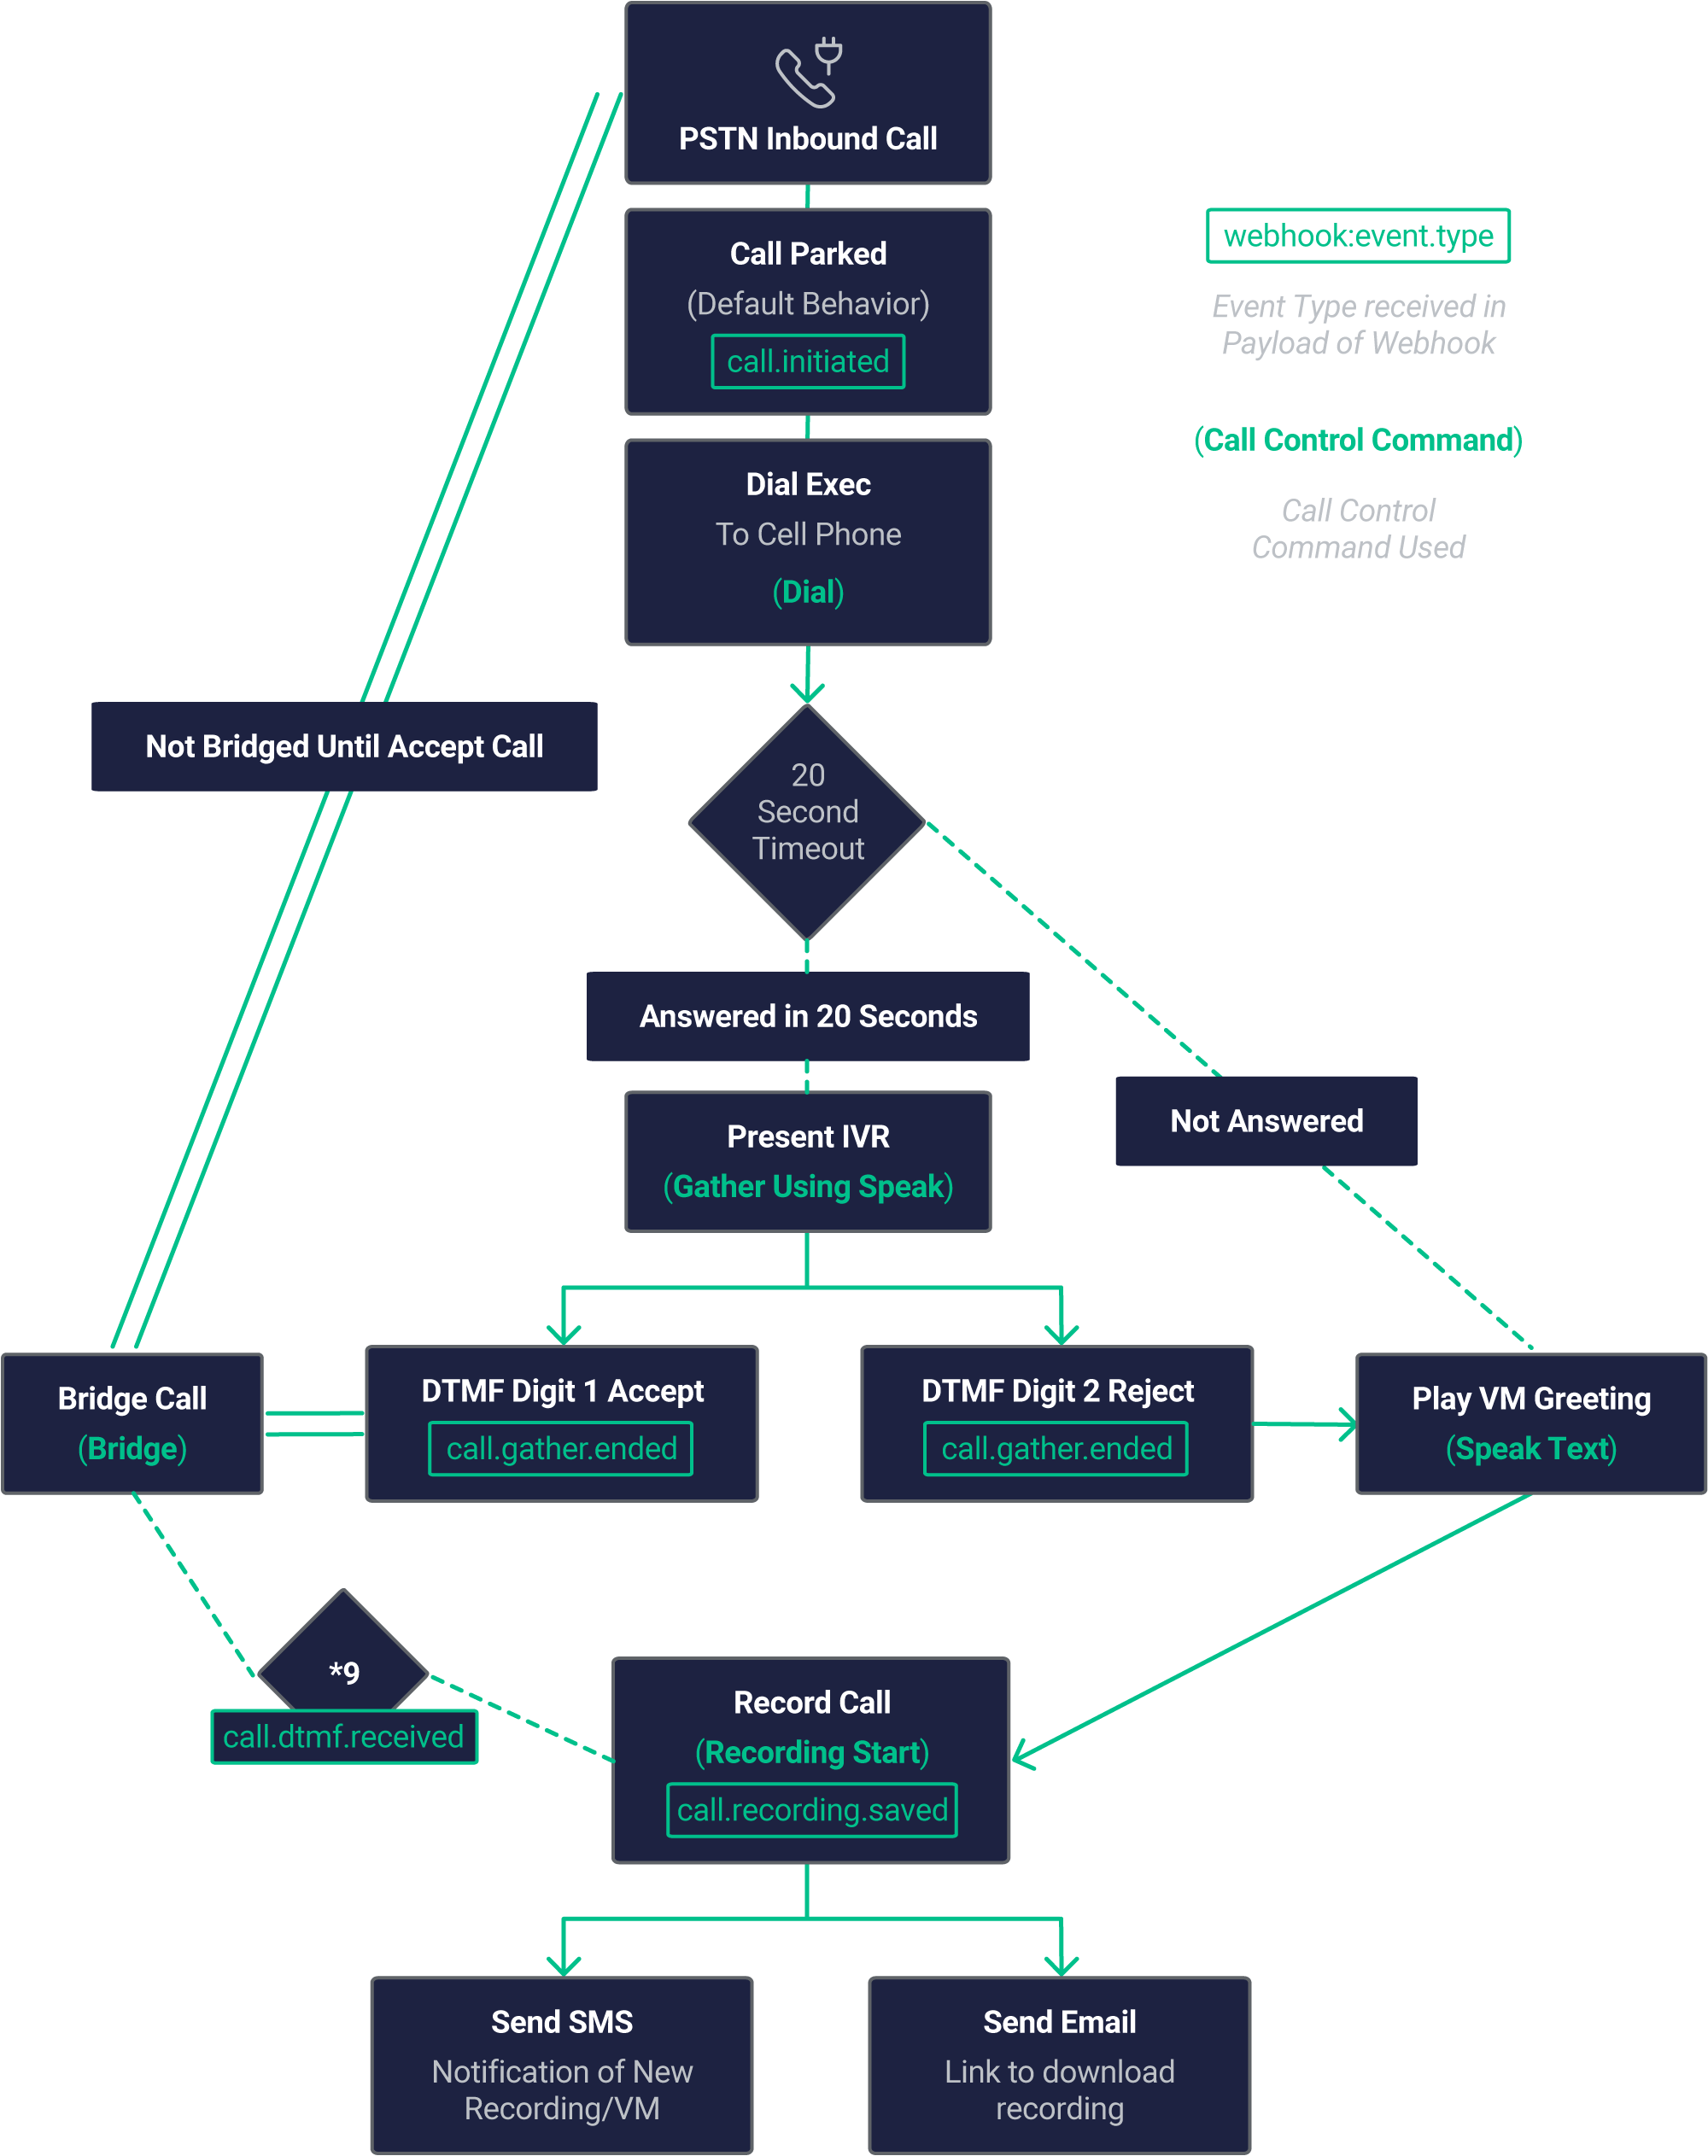
With all the basic Telnyx Voice API Commands set, we are ready to consume them and put them in the order that will create the IVR. For this tutorial we want to keep it simple with a flow that corresponds to the following IVR Logic:- Answer the incoming call
- Present the options to the caller
- Transfer the caller based on their selection
Creating the IVR
In a separate file we can create a simple class to build the Gather strings based on a simple json configuration file. The objective is to separate the IVR functionality from the spoken sentence. This will allow the IVR prompts to be updated without changing Python code.IVR class
After pasting the above content, Kindly check and remove any new line added
Instantiating the IVR class
The app uses a basic JSON configuration fileivrConfig.json
After pasting the above content, Kindly check and remove any new line added
- Read the file
- Covert the JSON to a dict
- Create the class
After pasting the above content, Kindly check and remove any new line added
my_ivr as a global variable for the Flask route to generate prompt strings and check the user pressed digits.
After pasting the above content, Kindly check and remove any new line added
Answering the Incoming Call
Now, we can add a simple Call command to answer the incoming call. Underneath where we check if the event iscall_initiated. To keep track of which call is which; we’ll set the direction to the client_state using pythons native base64 encoding.
👀 At the top ⬆️ of the app.py file add import base64
After pasting the above content, Kindly check and remove any new line added
- Base64encodes the direction value
- Sets as client_state
- actually answers the call.
Presenting options
Now that we have answered the call, we can use theGather Using Speak command to present some options to the user. To do this, we will check the event and check to see that client_state exists. The outbound transferred call leg will also emit the call.answered event; however, the client_state value will be null. Otherwise, the called party would also be presented with the gather prompt.
After pasting the above content, Kindly check and remove any new line added
my_ivr object we created earlier, we can send Gather Using Speak audio to the number. This code present the caller with the generated prompt my_ivr.get_prompt()
Interpreting button presses
Our next check will be to see what digit is pressed when the gather has completed & sends thecall.gather.ended event. We’ll extract the digits from the payload and use our instantiated IVR class to lookup the transfer number.
Finally, we’ll send the transfer command to Telnyx to transfer the user to their destination.
After pasting the above content, Kindly check and remove any new line added
Conclusion
Take a look at the GithHub Repo for a commented version of this code to use as a base for your IVR application!Node
⏱ 60 minutes build time || Github Repo Telnyx Find Me/Follow Me IVR demo built on the Telnyx Voice API V2 and node.js. In this tutorial, you’ll learn how to:- Set up your development environment to use Telnyx Voice API using Node.
- Build a find me/follow me based app via IVR on Telnyx Voice API using Node.
Prerequisites for building an IVR with node
This tutorial assumes you’ve already set up your developer account and environment and you know how to send commands and receive webhooks using Voice API. You’ll also need to havenode installed to continue. You can check this by running the following:
After pasting the above content, Kindly check and remove any new line added
After pasting the above content, Kindly check and remove any new line added
The Basics of Telnyx Voice API
For the Voice API application you’ll need to get a set of basic functions to perform Telnyx Voice API Commands. This tutorial will be using the following subset of basic Telnyx Voice API Commands:- Voice API Bridge Calls
- Voice API Dial
- Voice API Speak Text
- Voice API Gather Using Speak
- Voice API Hangup
- Voice API Recording Start
telnyx, so make sure you have it installed. If not you can install it with the following command:
After pasting the above content, Kindly check and remove any new line added
After pasting the above content, Kindly check and remove any new line added
Auth tab you select Auth V2.
Once you have them, you can include it as ‘const’ variable in your code:
After pasting the above content, Kindly check and remove any new line added
telnyx-config to store this information. Here we will store our API Key as well as our connection ID, the DID associated with that connection and the PSTN DID we will send calls to.
After pasting the above content, Kindly check and remove any new line added
After pasting the above content, Kindly check and remove any new line added
Understanding the use of the SDK
There are several aspects of the SDK that deserve some attention:-
Input Parameters: to execute every Telnyx Voice API Command you’ll need to feed your function with the following:- the
Call Control ID - the input parameters, specific to the body of the Command you’re executing.
- the
After pasting the above content, Kindly check and remove any new line added
Call Control ID except Dial. There you’ll get a new one for the leg generated as response.
In this example you can see that Call Control ID is input to the Telnyx Call Object. The command to utilize is then specifed when the new Call Object is called with the input paramters pertaining to that command.
Telnyx Voice API commands
This is how every Telnyx Voice API Command used in this application looks:Voice API bridge
After pasting the above content, Kindly check and remove any new line added
Voice API dial
After pasting the above content, Kindly check and remove any new line added
Voice API gather using speak
After pasting the above content, Kindly check and remove any new line added
Voice API speak
After pasting the above content, Kindly check and remove any new line added
Voice API hangup
After pasting the above content, Kindly check and remove any new line added
Voice API recording start
After pasting the above content, Kindly check and remove any new line added
SMS send notification
After pasting the above content, Kindly check and remove any new line added
The client state parameter
Client State: within some of the Telnyx Call Control Commands list we presented, you probably noticed we were including the Client State parameter. Client State is the key to ensure that we can perform functions only when very specific conditions are met on our App while consuming the same Call Control Events.
Because the Telnyx Voice API is stateless and async your application will be receiving several events of the same type, e.g. user just included DTMF. With Client State you enforce a unique ID to be sent back to Telnyx which be used within a particular Command flow and identifying it as being at a specific place in the call flow.
This app in particular will bridge two seperate calls together in the event the user chooses to accept the call. Thus the call_control_id of the pending bridge call must be mapped, and not be risked to being stored in a variable which could be re-assigned while we are waiting for gather response - should a new call be intiated.
Build client state object and encode to base64
After pasting the above content, Kindly check and remove any new line added
Building find me follow me IVR
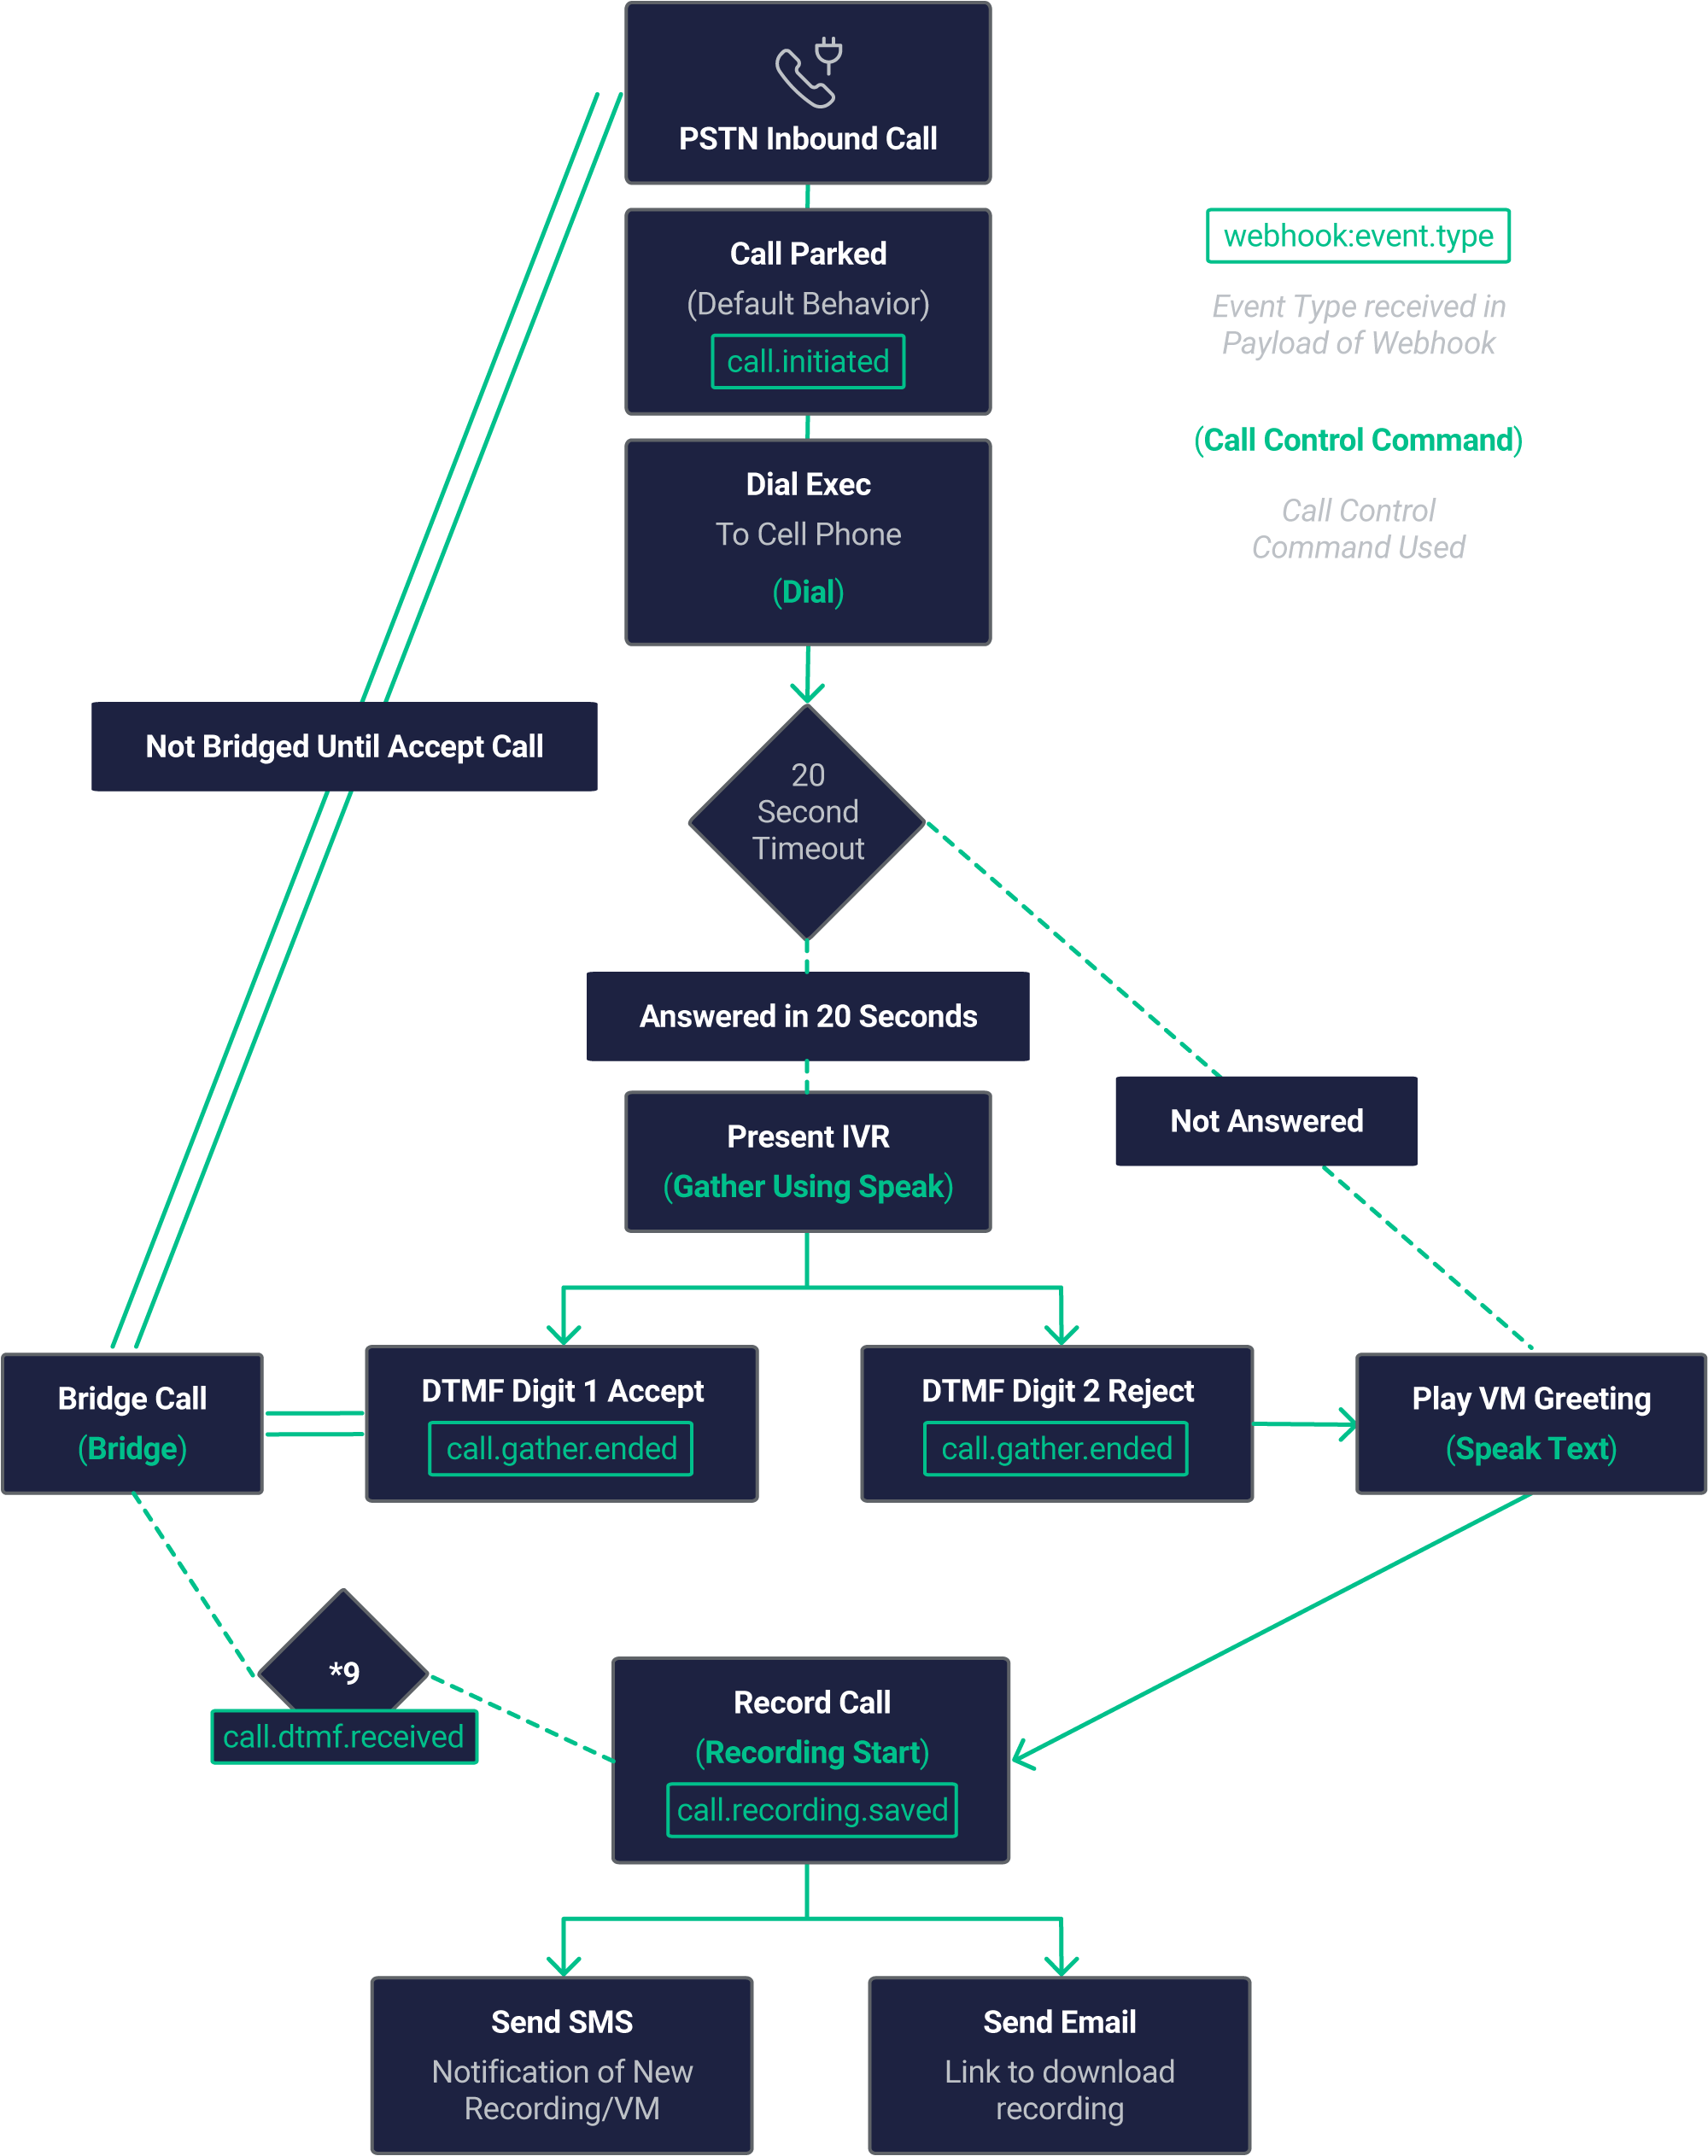
With all the basic Telnyx Voice API Commands set, we are ready to consume them and put them in the order that will create the IVR. For this tutorial we want to keep it simple with a flow that corresponds to the following IVR Logic:- Allow the incoming call to be parked.
- Execute dial function to the user’s PSTN number.
- Present an IVR allowing them to Accept or Reject the call and execute a 20 second timeout to hangup for no answer.
- When the user answers, they will be met with an IVR Greeting:
- Press 1 to Accept the Call - The Parked Call and this Dialed call will now be Bridged. The Timeout to Hangup the Dial call to user will be cleared.
- Press 2 to Reject the call - The Dialed Call will hang up. The Parked call will enter the Voicemail Functionality via Speak and Recording Start
- At any time during the caller, the user can press *9 to initiate on demand call recording.
- An SMS notification will be sent to the user to notify them of a call recording or voicemail message. (Optionally) - the nodemailer function will send an email to the user with a link to download and listen to the recording.
 To exemplify this process we created a simple API call that will be exposed as the webhook in Mission Portal. For that we would be using
 express:
After pasting the above content, Kindly check and remove any new line added
express we can create an API wrapper that uses HTTP GET to call our Request Token method:
After pasting the above content, Kindly check and remove any new line added
g_appName in the previous point. That is part of a set of global variables we are defining with a certain set of info we know we are going to use in this app: TTS parameters, like voice and language to be used and IVR redirecting contact points.
You can set these at the beginning of your code:
After pasting the above content, Kindly check and remove any new line added
APP CODE GOES HERE. So as you expose the URL created as Webhook in Mission Control associated with your number, you’ll start receiving all call events for that call.
So the first thing to be done is to identify the kind of event you just received and extract the Call Control Id and Client State (if defined previously):
After pasting the above content, Kindly check and remove any new line added
Event Type and client_state received, it’s just a matter of having your application reacting to that. Is the way you react to that Event that helps you creating the IVR logic. What you would be doing is to execute Telnyx Call Control Command as a reaction to those Events.
Webhook call initiated >> Command answer call
If our event_type is call.initiated and the direction is incoming we are going to execute the command to Dial the User. After the Dial is executed and we get a new webhook for the dialed call which the direction will be “outgoing,” we will specify our timeout_secs parameter to 30 seconds so that the user’s mobile voicemail doesn’t pick up and we leave an empty message there
After pasting the above content, Kindly check and remove any new line added
Webhook dial answered >> Command gather using speak
Once your app is notified by Telnyx that the call was established you want to initiate your IVR. You do that using the Telnyx Voice API Command Gather Using Speak, with the IVR message.
As part of the Gather Using Speak Command we indicate that valid digits for the DTMF collection are 1 and 2, and that only 1 digit input would be valid. Since we only want to execute this when the call is answered by the user via the dial, we set client_state to “stage-bridge” on the Dial seen above.
After pasting the above content, Kindly check and remove any new line added
200 OK.
Webhook call bridged >> Do nothing
Your app will be informed that the call was bridged should the user choose to accept the call. For the APP we are doing nothing with that info, but we will need to reply to that command.
After pasting the above content, Kindly check and remove any new line added
Webhook listen for DTMF to execute call recording on demand
We need to be listening for the specified digit in order to execute the recording on demand feature, specifically ***. Now this example is very rudimentary and is just for proof of concept. In production, the dtmf should only be received from the user’s call leg. Additionally here, we will empty the array once the condition is met and we execute the Recording Start Command. We are also re-using this to record are voicemail message.
After pasting the above content, Kindly check and remove any new line added
call.gather.ended and call.dtmf.received. The main difference is that in the gather webhooks dtmf will be sent as value to key “digits” and in dtmf.received the key will be “digit.”
Webhook gather ended >> Find me IVR logic
It’s when you receive the Webhook informing your application that Voice API Gather Ended (DTMF input) that the IVR magic happens:
We’re doing a number of things here.
- If the user presses 1, we are first going to clear the timeout for this Dialed call so it does not hangup automatically. Second, we are going to issue “bridge” to connect the caller and the user.
- If the user presses 2, we are going to do execute two commands. We will speak the voicemail greeting to the caller, and issue hangup to the users mobile.
l_call_control_idThe call control id of the latest webhook we just recieved the DTMF on and has aclient_stateof “stage-dial”l_bridge_idThe PSTN caller’s call control id, we set that variable to our client state object inl_client_state.bridgeIdearlier when we first received the webhook on the incoming call.
client_state as we’re only executing the bridge on the dial webhook that we set client_state of “stage-dial”.
Webhook gather ended >> Process DTMF for IVR
After pasting the above content, Kindly check and remove any new line added
Webhook call recording saved >> Send text message of recording
We are receiving a webhook of call.recording.saved after BOTH a voicemail has been recorded and if a record call on demand has been executed. Now in this web hook we will recieve a link to an mp3 recording of either the voicemail or recorded call. We are going to send an sms notification to the User via sms_send_notification. Optionally, we are using the nodemailer sdk to send an email to the user with the link so they can listen to the message or call.
After pasting the above content, Kindly check and remove any new line added
Lightning-up the application
Finally the last piece of the puzzle is having your application listening for Telnyx Webhooks:After pasting the above content, Kindly check and remove any new line added
After pasting the above content, Kindly check and remove any new line added
Ruby
⏱ 30 minutes build timeIntroduction to the call control framework
The Voice API framework, previously called Call Control, is a set of APIs that allow complete control of a call flow from the moment a call begins to the moment it is completed. In between, you will receive a number of webhooks for each step of the call, allowing you to act on these events and send commands using the Telnyx Library. A subset of the operations available in the Call Control API is the Call Control Conference API. This allows the user (you) to create and manage a conference programmatically upon receiving an incoming call, or when initiating an outgoing call. The Telnyx Ruby Library is a convenient wrapper around the Telnyx REST API. It allows you to access and control call flows using an intuitive object-oriented library. This tutorial will walk you through creating a simple Sinatra server that allows you to create an IVR demo application.Setup your development environment
Before beginning, please ensure that you have the Telnyx, Dotenv, and Sinatra gems installed.After pasting the above content, Kindly check and remove any new line added
After pasting the above content, Kindly check and remove any new line added
Setting environment variables
The following environmental variables need to be set| Variable | Description |
TELNYX_API_KEY | Your Telnyx API Key |
TELNYX_PUBLIC_KEY | Your Telnyx Public Key |
TELNYX_APP_PORT | Defaults to 8000 The port the app will be served |
.env file
This app uses the excellent dotenv package to manage environment variables. Make a copy of the file below, add your credentials, and save as.env in the root directory.
After pasting the above content, Kindly check and remove any new line added
Portal setup
This tutorial assumes you’ve already set up your developer account and environment and you know how to send commands and receive webhooks using Voice API. The Voice API Application needs to be setup to send API V2 webhooks:- Make sure the Webhook API Version is API v2.
- Fill in the Webhook URL with the address the server will be running on. Alternatively, you can use a service like Ngrok to temporarily forward a local port to the internet to a random address and use that. We’ll talk about this in more detail later.
ivr_demo_server.rb, then write the following to setup the Telnyx library.
After pasting the above content, Kindly check and remove any new line added
Receiving webhooks & answering a call
Now that you have setup your auth token andcall_control_id, you can begin to use the API Library to answer a call and receive input from DTMF. First, you will need to setup a Sinatra endpoint to receive webhooks for call and DTMF events. There are a number of webhooks that you should anticipate receiving during the lifecycle of each call. This will allow you to take action in response to any number of events triggered during a call. In this example, you will use the call.initiated and call.answered events to answer the incoming call and then present IVR options to the user. You’ll use the call.gather.ended event to parse the digits pressed during the IVR.
After pasting the above content, Kindly check and remove any new line added
.env file and create an endpoint at /webhook, which can be anything you choose as the API doesn’t care; here we just call it webhook.
After pasting the above content, Kindly check and remove any new line added
call object from the call_control_id nested in the webhook.data.payload JSON. This will allow you to send commands to the active call.
After pasting the above content, Kindly check and remove any new line added
Telnyx::Call object and store it in the active call list, then call call.answer to answer it if it’s an inbound call.
After pasting the above content, Kindly check and remove any new line added
call.answered event, we can call the gather_using_speak command to speak audio and gather DTMF information from the user input.
Take note that the valid_digits restricts the input to the caller to only the digits specified. The invalid_payload will be played back to the caller before the payload is repeated back if any invalid digits are pressed when the gather completes.
After pasting the above content, Kindly check and remove any new line added
valid, invalid, call_hangup, cancelled, cancelled_amd), the call.gather.ended event is sent to the webhook endpoint. From there, we can extract the digits field from the payload and play it back to the user using speak.
Take note that the call_hangup status indicates the caller hungup before the gather could complete. For that case, we’re done as speak does not work on an ended call.
After pasting the above content, Kindly check and remove any new line added
Authentication for your calls
Now you have a working conference application! How secure is it though? Could a third party simply craft fake webhooks to manipulate the call flow logic of your application? Telnyx has you covered with a powerful signature verification system! Make the following changes:After pasting the above content, Kindly check and remove any new line added
.env file. Look up your public key from the Telnyx Portal here. Telnyx::Webhook::Signature.verify will do the work of verifying the authenticity of the message, and raise SignatureVerificationError if the signature does not match the payload.
Final ivr_demo_server.rb
All together, your ivr_demo_server.rb file should resemble something like:
After pasting the above content, Kindly check and remove any new line added
Voice API Usage
If you used a Gemfile, start the conference server withbundle exec ruby ivr_demo_server.rb, if you are using globally installed gems use ruby ivr_demo_server.rb.
When you are able to run the server locally, the final step involves making your application accessible from the internet. So far, we’ve set up a local web server. This is typically not accessible from the public internet, making testing inbound requests to web applications difficult.
The best workaround is a tunneling service. They come with client software that runs on your computer and opens an outgoing permanent connection to a publicly available server in a data center. Then, they assign a public URL (typically on a random or custom subdomain) on that server to your account. The public server acts as a proxy that accepts incoming connections to your URL, forwards (tunnels) them through the already established connection and sends them to the local web server as if they originated from the same machine. The most popular tunneling tool is ngrok. Check out the ngrok setup walkthrough to set it up on your computer and start receiving webhooks from inbound messages to your newly created application.
Once you’ve set up ngrok or another tunneling service you can add the public proxy URL to your Connection in the MIssion Control Portal. To do this, click the edit symbol [✎] next to your Connection. In the “Webhook URL” field, paste the forwarding address from ngrok into the Webhook URL field. Add /webhook to the end of the URL to direct the request to the webhook endpoint in your Sinatra server.
Callback URLs for Telnyx applications
| Callback Type | URL |
| Inbound Calls Callback | {ngrok-url}/webhook |