

Telnyx Other APIs — Full Documentation
Account and billing, video, fax, SETI, OAuth, and platform APIs. Complete page content for the Other APIs section of the Telnyx developer docs (https://developers.telnyx.com). Root index: https://developers.telnyx.com/llms.txt · Lightweight index for this section: https://developers.telnyx.com/development/llms/other-apis-llms-txt.md
Account & Billing
Usage Reports
Source: https://developers.telnyx.com/docs/reporting/usage-reports.md
Overview
The (v2) Usage Reports API is a single endpoint that enables viewing aggregated usage data across all of a customer’s Telnyx products. It is built to be flexible and customizable, so that you have programmatic access to view data in a way that makes sense to your business and use cases. It can be used to efficiently monitor usage trends and costs, as well as to directly integrate with your internal systems.Query Requirements
Products
A product from the Options response (see next section) must be included. At this time, there is not a way to view usage for all or multiple products at once. Products Supported:- Sip-Trunking (sip-trunking)
- Messaging (messaging)
- Voice API (call-control)
- Wireless (wireless)
- Cloud Storage (cloud-storage)
- Inference (inference)
- Verify 2fa (verify-2fa)
- Fax API (fax-api)
- WebRTC (webrtc)
- Calls per Second (cps)
- Conference (conference)
- Video API (programmable-video)
- Call Control Features (call-control-features)
- Customer Service Record (customer-service-record)
- Media Streaming (media-streaming)
- Noise Suppression (noise-suppression)
- Text to Speech (text-to-speech)
- Speech to Text (speech-to-text)
- Recording (recording)
- Forking (forking)
- Media Storage (media-storage)
- Answering Machine Detection (amd)
Dates
The start and end date parameters should be in the formatYYYY-MM-DDThh:mm:ssTZD (eg 2022-12-24T19:20:30-05:00). This allows you to specify the timespan in your local time by including the timezone offset. The start_date parameter is inclusive, while the end_date parameter is exclusive - e.g. if you wanted data for all of February, the start_date would be 2023-02-01T00:00:00-00:00 and the end_date would be 2023-03-01T00:00:00-00:00. Billing usage is calculated using UTC. The maximum range supported is 31 days.
Another way to specify the timespan you want is to utilize the date literals spelled out in our developer docs - https://developers.telnyx.com/api#date-literals. This can be achieved by replacing start_date & end_date with date_range like this: date_range=last_1_weeks.
To see the requested data broken out by day for the timespan selected, there is a date dimension available on all products. Additionally, there’s a breakout by hour available using the date_time dimension.
Format
Specifying a format is optional. The endpoint returns JSON by default. At this time, the API also supports generating a CSV file from the response by specifyingformat=csv in your query.
Dimensions & Metrics Options Per Product
To view the products with their dimensions and metrics available for reporting, you can make a request to the endpoint below. Metrics are the values you’re interested in, for example, the number of calls attempted or the total cost of your usage. Dimensions are how you want your data broken out, for example, by connection, messaging profile, or the traffic’s direction. Below, you’ll see a sample of the “Options” response for Sip-Trunking. If you already know the product you want and are looking for only its supported dimensions/metrics, you can pass the product parameter as shown in the example. If you want to see all products, simply leave off the product parameter.Request:
Don’t forget to updateYOUR_API_KEY here.
Response:
Product Examples
SIP Trunking
Example 1: Simple SIP Report
Let’s say we’re interested in our sip-trunking usage for the week of January 23rd. And let’s say we want to see the total calls connected versus calls attempted and the total cost. And we need these numbers broken out by direction and country. We first make a query to the Options endpoint listed above to make sure those requirements are all supported and to see how to query for them. These are our requirements shown next to how we’d construct our query for them: Product: sip-trunking product=sip-trunking Date(s): January 23rd - 28th 2024 start_date=2024-01-23T00:00:00-00:00end_date=2024-01-29T00:00:00-00:00 Metrics: calls connected, calls attempted, cotal cost metrics=connected,attempted,cost Broken out by destination countryNote: Since we’re filtering on the direction, we must include it. dimensions=country_code,direction Outbound only filter[direction]=outbound API Response’s Page Size/Number page[number]=1page[size]=20Request:
Response:
From the response below, we can see that during the week in question, our account only had traffic to the US (country code = 1). Our connected versus attempted is 883,930 vs 1,245,811 calls respectively. And the total cost for those outbound calls was 1911.624 (Note: If you had wanted the currency, that is another dimension that can be added in the query withdimensions=currency).
Example 2: Short Duration Calls
Telnyx enforces automatic surcharges for customer accounts whose short duration calls (greater than 0 and less than or equal to 6 seconds) total 15% or more of their outbound traffic. As someone running SIP traffic, I may want to know if I’m in danger of receiving the surcharge at the end of the month. We have exposed a metric solely for the purpose of this calculation. Product: sip-trunking product=sip-trunking Date(s): January 2024 start_date=2024-01-01T00:00:00-00:00end_date=2024-02-01T00:00:00-00:00 Metrics: calls completed metrics=completed Broken out by SDC (short duration call: true or false)Note: Since we’re filtering on the direction, we must include it. dimensions=short_duration_call,direction Outbound only filter[direction]=outbound API Response’s Page Size/Number page[number]=1page[size]=20Request:
Response:
From the response below, we can determine the percentage of our traffic that is currently considered short duration:414515 / (414515 + 522094) = 44%. If we wanted to take this a step further, we could see which connections are the biggest offenders by adding “connection_id” to the dimensions list.
Messaging
Example 1: Simple Messaging Report
In this example, we’ll put together a simple request to view our Messaging usage for a single day. Product: messaging product=messaging Date(s): Today date_range=today Metrics: total cost, total messages sent, total message parts metrics=cost,count,parts Broken out by CarrierNote: Since we’re filtering on the direction, we must include it. dimensions=short_duration_call,direction Outbound only filter[direction]=outbound API Response’s Page Size/Number page[number]=1page[size]=20Request:
Response (abbreviated):
Example 2: Alphanumeric by MNC/MCC
This example is a little more complex, and lays out a monthly Messaging report of our Alphanumeric traffic per country, broken out by MCC (Mobile Country Code) and MNC (Mobile Network Code). Product: messaging product=messaging Date(s): January 2024 start_date=2024-01-01T00:00:00-00:00end_date=2024-02-01T00:00:00-00:00 Metrics: total cost, total message parts metrics=cost,parts Dimensions: mcc, mnc, destination country, status_v2 dimensions=direction,mcc,mnc,country_iso,product_name,status_v2 Filters: alphanumeric, outbound, billable statuses only filter[product_name]=alphanumeric_idfilter[direction]=outboundfilter[status_v2]=deliveredfilter[status_v2]=delivery_failedfilter[status_v2]=delivery_unconfirmedRequest:
Response (abbreviated):
Session Analysis
Source: https://developers.telnyx.com/docs/reporting/session-analysis.md
Session Analysis API Usage Guide
Understand the full cost and event tree for any Telnyx AI or voice session — from a single inference call to complex multi-product conversations.What is Session Analysis?
Session Analysis gives you a complete view of costs and events for any usage session on the Telnyx platform:- Full event tree — parent events, child events, and their relationships
- Rollup costs — per-event costs plus cumulative totals across the session
- Product linkages — how different Telnyx products interacted in a single session
When to Use It
Core Concepts
Record Types
A record type identifies the category of usage event for a Telnyx product. Each record type maps to a specific product and has defined relationships to other record types. Example:ai-voice-assistant is the record type for AI Voice Assistant sessions, which have inference events as children.
Sessions
A session is a tree of related usage events. The root event is the primary event you’re analyzing. Child events are related usage that occurred as part of that session. Example: An AI Voice Assistant call involves acall-session root with a call-control child, which in turn has an ai-voice-assistant child with inference events underneath — each representing one LLM turn in the conversation.
Relationships
Events are connected via relationships:
Relationships are defined via field mappings — the child’s
local_field matches the parent’s parent_field. For example, inference events link to their ai-voice-assistant parent via the conversation_id field.
Cost Rollup
Each event node includes:event_cost— Cost of this individual eventcumulative_cost— This event’s cost plus all descendant costs
cumulative_cost equals the total session cost. For AI sessions, this means the call-session cumulative cost includes everything — the AI assistant, each inference turn, STT, TTS, call control, and SIP trunking — rolled up into one number.
Endpoints
1. List All Record Types
record_types[]— Array of all record types with their parent/child relationshipsquery_parameters— Valid parameters for session analysis queriesmeta— Total count and last updated timestamp
2. Get Record Type Details
- Valid child and parent relationships
- Example query URLs
- Recommended max depth for traversal
3. Get Session Analysis
You can find event IDs in the individual webhooks or detail records for the applicable event.
Which record type should I use? If you’re analyzing a call made with your AI assistant, start with
call-session. This gives you the full picture — AI assistant sessions, inference events, call control, SIP trunking, and all other products in one tree. Use the metadata endpoint to explore other starting points for different products.
Query Parameters:
Example:
Response Structure
Top-Level Fields
Event Node Structure
Each event in the tree follows this structure:Relationship Object
For child events, therelationship field explains the connection:
Note: The
via fields vary by relationship. AI-related linkages often use conversation_id, while voice/telephony relationships typically use telnyx_session_id or call_session_id.
Example: AI Voice Assistant Session
A customer makes an inbound call to an AI Voice Assistant using the Telnyx Web Dialer. The assistant handles a multi-turn conversation over ~152 seconds. Query:
Key observations:
- The call-session root has $0.00 event cost — it’s a container for the session, not a billable event itself.
- ai-voice-assistant is the dominant cost at 0.06/min for 3 billed minutes). Its cumulative cost of $0.1921 includes 5 inference events underneath.
- Each inference event represents a single LLM call during the conversation — one per assistant turn. The cost per turn varies based on the model and token count.
- call-control has a 0.1973 cumulative cost — the difference is the ai-voice-assistant subtree rolling up underneath it.
- recording, webrtc, and sip-trunking are leaf nodes with no children, so their event cost equals their cumulative cost.
Understanding the AI Cost Structure
In an AI-powered call, costs come from multiple layers:
Session Analysis rolls all of these into one tree, so you can see exactly where cost accumulates — whether it’s the AI assistant minute rate, the number of inference turns, or the underlying voice transport.
Common Use Cases
Debugging High-Cost AI Sessions
- Query the session with
max_depth=5to get the full tree - Look at
meta.productsto see which products were involved - Compare
event_costacross children — ifai-voice-assistantis the driver, check how many inference turns occurred underneath - Check
recordfields for rate information (rate,rate_measured_in) and duration
Finding Related Events
- Start from any event in the tree
- Use
relationship.viato understand the field linkage - Query the parent or children directly using their
id
Exporting for Analysis
- Use
expand=noneto get just the tree structure without full records - Flatten the tree programmatically for spreadsheet import
- Or keep full records and parse specific fields (e.g.,
rate,duration_sec)
Best Practices
Performance
- Provide
date_timewhen you know it — this narrows the index search and improves response time - Use appropriate
max_depth— start with2, increase only if needed. AI sessions with inference events typically needmax_depth=4or5to reach the leaf level. - Use
expand=noneif you only need cost rollups, not full records
Querying
- Start from the root event — the most complete picture comes from the top-level event
- Check metadata first —
/metadata/{record_type}shows expected children and recommended depth - Use
links.recordsto get the underlying detail records for deeper analysis
Error Handling
Record Types Reference
AI & Voice Intelligence
Voice & Telephony
Media & Storage
Conferencing
Messaging
Video
Other Products
On-Demand Reports
Source: https://developers.telnyx.com/docs/reporting/on-demand-reports.mdOn-Demand Reports lets you query your Telnyx usage data using natural language. Instead of building filters and exporting CSVs, describe the report you want in plain English and the system generates it.
Overview
On-Demand Reports uses AI to translate natural language into structured queries against your Usage Report data. You can request specific chart types, date ranges, groupings, and breakdowns — all from a single text input.Getting started
- Log in to the Mission Control Portal.
- Navigate to Reporting > On-Demand Reports.
- Type a query describing the report you need and submit it.
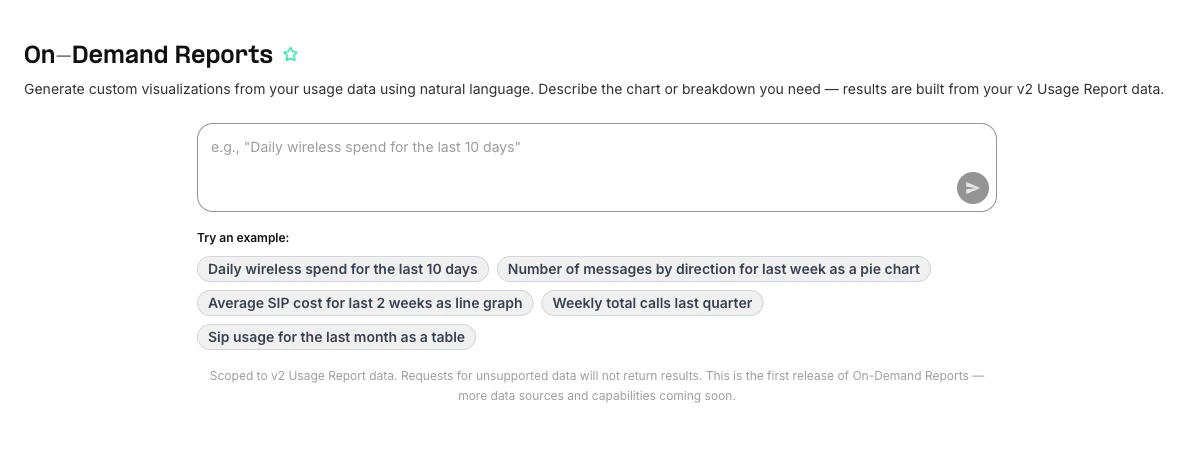
Example queries
- “Daily wireless spend for the last 10 days”
- “Number of messages by direction for last week as a pie chart”
- “Weekly total calls last quarter”
- “Average SIP cost for last 2 weeks as line graph”
- “SIP usage for the last month as a table”
What you can do
Current limitations
- Queries run against v2 Usage Report data only. Products and dimensions available in Usage Reports are available here.
- Not a general knowledge assistant — the system answers questions about your Telnyx usage data, not general questions.
- This is the first release. Coverage and capabilities will expand over time.
Video
Getting Started
Source: https://developers.telnyx.com/docs/video/get-started.mdTelnyx Video Rooms are enabled using the Rooms API. You can create as many rooms as needed using this API. To access a Telnyx Video Room, a Client Join Token will first need to be generated in JWT form. You can use our HTTPS API and authenticate using the API Key associated with your Mission Control account under API Keys. Find out more about authenticating with API V2 here. Adding Telnyx Rooms functionality to your app can be done using our JS SDK (mobile SDKs coming soon). To gain access to a live Video Rooms sample app, reach out to our sales team today! Check out the full API reference today!
Glossary
Room Resource representing a virtual place where multiple endpoints using one of Telnyx’s Programmable Video SDKs can connect. Room Session Resource representing a moment where multiple Room Participants were communicating within a given Room. Room Participant Resource representing an endpoint using one of Telnyx’s Programmable Video SDKs to connect to a given Room. JWT JSON Web Token. A standard method for representing claims. Client Join Token (JWT) A JWT token which contains grants allowing in the Room usecase to join a Room. Refresh Token (JWT) A JWT token which permits to obtain a new Client Token with same grants. API Key Secret API Key generated via Portal and used to authenticate Telnyx API calls. Video SDK A library used to provide Video features to your application using Telnyx Video platform. Configuration and usage Telnyx Video is enabled using Video Rooms. A Video Room represents communications session among multiple endpoints using one of Telnyx’s Programmable Video SDKs. Connected users (Participants) can share video and audio Tracks with the Room, and receive video and audio Tracks from other Participants in the Room. You can as many Rooms as you want. For example you could create a long lived Room such as “Daily Standup”, or Rooms that you would delete after it’s been used like “1-1 with X”. To create a Video Room you can use the REST API V2 documented{” ”} here. A Video Room can only be joined if the client owns a Client Join Token, you can create it using the REST API V2 documented{” ”} here. The Client Join Token is short lived and you will be able to refresh it using the{” ”} Refresh Token provided with it when you request for a Client Join Token. Once you have a Video Room and an Client Join Token for it, you can then use our Video SDK on your client side to connect your client to the Room you just created.Concepts
Architecture
Video Rooms is a platform that enables developers to add audio and video capability to Web, Android, and iOS applications.
The platform consists of REST APIs, Client SDKs, and our mission control portal that makes it really easily to capture, stream, record, and render live audio and video.
A video application built with Video Rooms has to parts:
- Client: Our client side Javascript, iOS, and Android SDKs used to interact with a
Roominstance - Server: Our REST APIs and portal to create/manage room and session, configuring recording, or leverage our
Participants APIto moderator participants in aRoom.
Terms
Understanding the basic concepts of the video SDK will help you understand how it works. These concepts apply in general across all of our platforms.-
A
Roomrepresents a real time audio/video/screen share session with other people or participants. It is fundamental to building a video application. -
Room Statetracks the state of the room as it changes making it extremely easy to understand what’s happened to aRoom.For example: Room State could change due to a Local Participant has started publishing a stream or because a Remote Participant left. A Stream represents the audio/video media streams that are shared by Participants in a Room
-
A
Participantrepresents a person inside aRoom. EachRoomhas oneLocal Participantand one or moreRemote Participants. -
A
Streamrepresents the audio/video media streams that are shared byParticipantsin aRoom- A
Streamis indentified by it’sparticipantIdandstreamKey
- A
-
A
Subscriptionis used to subscribe to aStreambelonging to aRemote Participant
Dive a bit deeper
Dive a little bit deeper into ourVideo Rooms platform to get a better understand of what its capable of, and what you can buid. Learn more about our Client SDKs and Server APIs.
Client SDKs
Our Javascript SDK API reference which details the API of our SDK including behaviors of theRoom class and the Events that triggers and how they function.
Server APIs
- Rooms - manage Rooms
- Client Access Tokens - manage client access tokens needed to interact with a
Room - Sessions - manage room sessions, end a session, and mute/unmute/kick all participants in a given session.
- Participants - search for participants based on a number of filters like
session id - Recordings - manage recordings, including bulk delete.
- Compositions - create and manage compositions.
Getting Started
Source: https://developers.telnyx.com/docs/video/javascript-sdk.mdThe Telnyx Video Client SDK provides all the functionality you need to join and interact with a video room from a browser.

Adding Telnyx to your JavaScript client application
Include the@telnyx/video npm module as a dependency:
npm install @telnyx/video --save
After pasting the above content, Kindly check and remove any new line added
Then, import @telnyx/video in your application code.
Understanding the state of the video room
Thestate_changed event callback contains the state of the SDK at that point in time. This is an immutable object that you can use in most modern UI libraries like React and Vue.
The Typescript definition of the State is helpful in understanding the structure of this object.
state_changed callback is invoked with a new immutable state that represents the current state of the SDK. Since most modern UI libraries are able to compare the two immutable states and render only the components that changed it makes it easier to integrate the SDK with them rather than depending on multiple event callbacks.
For e.g., based on how we initialized it in the above code example the initial state of the SDK would result in an object give below. Note that the ID of the local participant is unique and are generated based on UUID v4 standard when you create the local participant.
room.connect() method in the example code the state of the SDK will change to the following …
state_changed callback. Since state is immutable the only difference between the initial state and the new state is the status property. If you are using a modern UI library like React you can easily rerender the components to show that the application is connecting to the room.
When successfully connected the state changes to …
Publishing your local camera and mic stream
In order to publish a stream you need to define the constraints of the media. The simplest form of the constraints is …publish method available to you via the room object.
publish is a string that acts as the key that you can use to refer to this specific stream. You can use any valid string for this as long as you are consistent in your application. For e.g. here we’re using ‘self’ for the camera/mic stream but you could use ‘presentation’ as the key for when you publish video of the screen. We will get to how you can publish your screen in a short while.
When you make the request to publish a stream, the browser will ask for the necessary permissions required to access the camera and mic. Once the permissions are acquired the SDK will configure and publish the stream to the room you are connected to.
At this point you will receive the new state to the state_changed event callback with the newly created stream.
isPublishing property of the stream is true now. This means that the stream is being published, which involves creating the SDP (Session Description Protocol) and establishing the WebRTC connection. You can’t publish another stream of the same key (“self” in our case) until this stream is published or removed (by unpublishing).
Once the SDK acquires the media tracks from the camera and mic of the local participant a new state will be returned using the state_changed callback. This state will contain the audio and video track from the local media devices.
The streams object at this point will look like this
source or the media tracks individually from audioTrack and videoTrack to show the media in your UI.
You can also see that the audioActive and videoActive flags are now true indicating the stream is publishing audio and video respectively.
Another property that was updated in the new state is the isConfiguring flag. You can ignore this in most use-cases as this indicates if the WebRTC connection is being negotiated.
Once the WebRTC connection is negotiated and the stream is successfully published the stream state would look like this
Knowing when a new participant joins the room
A video room can have multiple participants and you can get a list of all the participants connected to the room at the time by using theparticipants property in the state.
If the participant is not publishing any streams the streams property of that participant will be an empty object.
Let’s imagine that another participant joins the same room from a different browser session with the following context
participants object that maps to the remote particpant from the previous browser session. This remote participant also has a stream with the key “self”.
The stream object for “self” has the structure very similar to the one we saw before but has a few new properties.
The ones that are particularly interesting are subscription, videoCodec, and audioCodec. The properties for video and audio codec can be used to decide if the browser has the capabilities to decode the video and audio tracks.
Then there is subscription.status, which is unpublished at the moment.
Subscribing to a remote stream
At this point we are ready to subscribe to the remote stream published by the participant. In order to do that we use thesubscribe method from the room object.
subscription.status will change to subscribed.
You can use the source property, which is an instance of MediaStream to render the media on the browser.
If the remote participant unpublishes this stream the SDK will automatically unsubscibe from the stream and the stream will disappear from the state.
Room and Events
Source: https://developers.telnyx.com/docs/video/javascript-sdk/room-events.mdTelnyx’s video JavaScript SDK lets you manage room events and join/leave notifications. We’ve made it much easier to add video capability to your web application using our Javascript SDK. The
Room object and the Events that occur in a Room is the API you will use to build your video application. We’ve extensively documented the interface for the Room and Events objects, below.
Room
Room events
Tutorial
Source: https://developers.telnyx.com/docs/video/javascript-sdk/javascript-video-tutorial.md
In 10 minutes we’ll build
A simple web app in vanilla javascript to make a video with audio from a caller to a callee.Get an API Key
You need a Telnx account to create an API key so you can interact with our Rooms API
- If you don’t have one please: Sign up for a free account
- Navigate to API Keys section and create an API Key by clicking
Create API Keybutton. - Copy your API key
Create a Room
Let’s use our Rooms API to create a room. Request Don’t forget to updateYOUR_API_KEY here.
id field, this is the id for your newly created Room.
Generate a client token
You’ll need a client access token to join the room. To create one use our REST APIrooms/create endpoint.
You’ll need to replace ROOM_ID in in the url of the command with your room id, above. As well as YOUR_API_KEY as you have in previous steps.
Request
token field in the response is the client access token you’ll use to join the room.
🏁 Checkpoint - run the app
At this point you should have the following:- An API Key
- A room ID
- A room client access token
Let’s write some code
Basic concepts of the video SDK Here are some basic concepts of the SDK that will help you better understand how it works.-
A
Roomrepresents a real time audio/video/screen share session with other people or participants. It is fundamental to building a video application. -
A
Participantrepresents a person inside aRoom. EachRoomhas oneLocal Participantand one or moreRemote Participants. -
A
Streamrepresents the audio/video media streams that are shared byParticipantsin aRoom- A
Streamis indentified by it’sparticipantIdandstreamKey
- A
-
A
Participantcan have one or moreStream’s associated with it. -
A
Subscriptionis used to subscribe to aStreambelonging to aRemote Participant
Room instance that we’ll need to finish building this app that makes a video call.
connected- triggers when a room instance has connected to the serverparticipant_joined- triggers when a remote participant joins the roomstream_published- triggers when a stream has started being published to the roomsubscription_started- triggers when subscription to remote stream has started
🏁 Checkpoint
It might be helpful to take a look at the full list ofEventsavailable on aRoominstance.
Connect to the room and get local media
NOTE: We can start implementing our code after the room.initialize block inside the sandbox above.
Let’s connect to the room and use the standard WebRTC API to get the audio and video tracks from the device.
Publish the stream and render it
We want to a add/publish a stream the room which consists of the audio and video track we received from the user’s device, above. We’ll give the stream a key of “caller”, which is how the stream is identified.room.connected block looks like this:
Subscribe to the callee’s remote stream
As a caller, how do we know when the callee has joined the room or has started publishing a stream? That’s where theparticipant_joined and the stream_published events that we went over earlier, come into play.
We need to listen for teh stream_published event like this:
stream_published event is triggered for both local and remote streams. __
In our case, we want to know when the callee’s remote stream starts publishing so we can subscribe to it. We already know that the caller has published a “caller” stream so we can ignore that event.
Subscribing to a stream
When a stream is published in a room it doesn’t mean it’s audio and video tracks are accessible, yet. In order to access a remote stream’s track we must explicitly subscribe to that stream and wait for the subscription_started event.
Render the callee’s remote stream
We’re almost there! Now, we can listen to thesubscription_started event and use args from that handler to get the callee’s remote stream and render it to the DOM.
Run the app
To run the app:- Open the sandbox, the browser here represents the caller’s app
- Open the app in another tab, this represents the callee’s application which you’ll need to interact with.
- Click the call button
- You should be prompted by the browser for camera/micrphone access please allow.
- You should also see video from your device’s camera and hear audio from the microphone
- You should see some console log, if things are working property
- If you see errors your client token has expired and you need to regenerate it.
- Click the call button
- Notice in the caller’s app a stream subscription was logged
- The callee’s video/audio stream is rendered.
Android SDK
Source: https://developers.telnyx.com/docs/video/android-client-sdk.mdThe Telnyx Video Android SDK is simple to use and makes it easy to get started with video calling. With this SDK, you can easily add video calling to your app with just a few lines of code. It provides all the functionality you need to join and interact with a Telnyx Room from an Android application.
A link to the repo can be found here:
Android SDKProject structure
- SDK project: sdk module, containing all Telnyx SDK components as well as tests.
- Demo application: app module, containing a sample demo application utilizing the sdk module.
Adding the SDK to your Android client application
Add Jitpack.io as a repository within your root level build file:Before connecting to a Room
Get an API Key
You’ll need an API key which is associated with your Mission Control Portal account under API Keys. You can learn how to do that here. An API key is your credential to access our API. It allows you to:- to authenicate to the Rest API
- to manage your access tokens
Create a Room to join (if it doesn’t exist)
In order to join a room you must create it, if it doesn’t already exist. See our Room Rest API to create one. There’s also additional resources on other endpoints available to perform basic operations on aRoom.
Generate an a client token to join a room
In order to join a room you must have a client token for thatRoom. The client token is short lived and you will be able to refresh it using the refresh token provided with it when you request a client token.
Please see the docs here to learn how to create a client token.
Now you are ready to connect to a video room that you previously created using the REST API.
Connect to Room
To connect, you’ll need to provide a participantName that will identify your user in that room. You’ll also need to provide an instance of ExternalData that will contain a username of type String and an Integer id. You will also provide your Android application’s context in contextPublish video/audio stream
To publish as video or audio stream, we will need an instance of PublishConfigHelper with the application context, camera direction, streamKey (unique for each stream published), and streamId (unique for each stream published)Remove video/audio track
To remove a video or audio track, publishConfigHelper has to be modified in order to remove the unwanted trackRemove stream
By removing the stream, we will remove all tracks added to it.Video/Audio Observables
The Telnyx Video SDK for android works with mutable live data, and all the information you need to build your UI is provided through observables that will contain the most up to date information of the state of the room, such as current participant list, talking events, stream information, participants added, participants leaving, etcState Observable
val status: String
is the status of the Room session, when that action happened
val participants: List
is the list of participants present in a room. A Participant is a UI representation in variables, for an attendee to the room session.
val streams: HashMap
this hash map, contains a track of the currently available streams and the id of the publisher streaming them.
A stream, will contain tracks for video, audio or both.
val publishers: List
This will track all publishers in the room. A Publisher is an instance of an attendee or participant sharing some stream content in the room.
A single Participant, sharing multiple streams can be also linked to multiple Publisher ids.
val subscriptions: List
Each time a publisher starts streaming information, we will have the option of subscribe/unsubscribe to/from it. This list will track all the subscriptions.
Event observables
Some observables will have a MutableLiveData of Event. Event is a wrapper of LiveData, and provide the means to ensure we only handle an observable once, no matter how many times we’re set to observe it. If the contents have already been handled, we won’t get that content again, unless we peekContent() instead.Participants Observable
Joined Room Observable
Joined Participant Observable
Leaving participant id Observable
Connected to room Observable
Participant stream changed Observable
Stream status
Subscribe to a video stream
In order to subscribe to a video stream, there are 3 actions that needs to be performed:Remove subscription to a *video stream
To remove a subscription we need to issueParticipant Talking Observable
Stats
We provide the method getWebRTCStatsForStream() to retrieve WebRTC stats This request brings stats one time only, so if you want to keep receiving stats, you will need to use some sort of runnable or coroutine to recursively request for them such as:Remote Video stats
WEBRTC’s RTCStatsReport can be parsed and mapped to RemoteVideoStreamStatsLocal Video stats
WEBRTC’s RTCStatsReport can be parsed and mapped to LocalVideoStreamStatsRemote audio stats
WEBRTC’s RTCStatsReport can be parsed and mapped to RemoteAudioStreamStatsLocal audio stats
WEBRTC’s RTCStatsReport can be parsed and mapped to LocalAudioStreamStatsiOS SDK
Source: https://developers.telnyx.com/docs/video/ios-client-sdk.mdThe Telnyx Video iOS SDK provides the functionality you need to join and interact with a video room from an iOS application.
A link to the repo can be found here:
iOS SDKIf you prefer to jump right in
Have a look at our demo app: Telnyx Meet.An overview of the Video API
These are important concepts to understand.-
A
Roomrepresents a real time audio/video/screen share session with other people or participants. It is fundamental to building a video application. -
A
Participantrepresents a person inside aRoom. EachRoomhas oneLocal Participantand one or moreRemote Participants. -
Room Statetracks the state of the room as it changes making it extremely easy to understand what’s happened to aRoom.Room Statecould change due to aLocal Participanthas started publishing a stream or because aRemote Participantleft.
-
A
Streamrepresents the audio/video media streams that are shared byParticipantsin aRoom- A
Streamis indentified by it’sparticipantIdandstreamKey
- A
-
A
Participantcan have one or moreStream’s associated with it. -
A
Subscriptionis used to subscribe to aStreambelonging to aRemote Participant
API of a Room
This should give you high level overview of the Room API and it’s functionality.Events that are triggered in a Room
Here’s a list of events that will fire as you make API calls.Understanding the state of the Room
Everything in the SDK centers around theRoom object. When the state of the Room changes (e.g. a new participant joins or a remote participant starts publishing a stream) the onStateChanged event is triggered.
The event is invoked with a state parameter which contains the current of the state of the Room.
Before getting started
Install the SDK
Currently, the Telnyx iOS Video SDK can be installed using CocoaPods. For instructions on that check out our releases repo for iOSGet an API Key
You’ll need an API key which is associated with your Mission Control Portal account under API Keys. You can learn how to do that here. An API key is your credential to access our API. It allows you to:- to authenicate to the Rest API
- to manage your access tokens
Create a Room to join (if it doesn’t exist)
In order to join a room you must create it, if it doesn’t already exist. See our Room Rest API to create one. There’s also additional resources on other endpoints available to perform basic operations on aRoom.
Generate an a client token to join a room
In order to join a room you must have a client token for thatRoom. The client token is short lived and you will be able to refresh it using the refresh token provided with it when you request a client token.
Please see the docs here to learn how to create a client token.
Code Examples
Enough already let’s get to the code. Here are some code examples to get your wet feet on how to start building something with the iOS video SDK.Participating in a Room
Connect to a room
First, you’ll need to create aRoom instance and then connect to it. Once you’re connected to a room, you can start sharing audio/video streams with other participant in the rooms.
Important Note:
This simply creates an instance of a Room in code it does not use the Rooms Rest API to create a room, mentioned above in “Create a Room to join”*
Room only has one Local Participant but can have multiple Remote Participants.
What is Room context?
Context is any details you want to include about theLocalParticipant of the Room.
For instance, let’s say you want to use context to identify a Participant with fields from an external system. You could pass a userId and username as context, like the code snippet above.
These details will be available to all RemoteParticipants in the Room, when they are notified about your presence in the Room.
Working with local media
Publishing audio and/or video from your camera or microphone works by usingMediaDevices. MediaDevices is a helper class that we provide for you to make it easy to grab local media from your device.
Setting the quality of the local video
You can set the camera resolution and fps usingMediaDevices.
Publishing a stream
Once you have tracks from say, a local media device like video from a camera and/our audio from your micrphone you can use those to create aStream and publish it in the Room.
Unpublishing a stream
If you can longer want to continue publishing a stream you canunpublish it.
Naturally the stream you want to unpublish must be added already.
Working with Remote Participants and Streams
A remote participant who joins or leaves the room
When a remote participant joins a a room you will be notified with theRoom.onParticipantJoined event. And similiarly with Room.onParticipantLeaving when a remote participant leaves.
You can use these events to keep track of participants in the room.
Remote participants already in the room
When you connect to aRoom there may already be remote participants in the Room. To understand who is in the Room after you connect use the onParticipantJoined event.
Display a remote participant’s media
In order to understand how to display a remote participants’ media let’s review on subscriptions work in the API. It might be helpful to review the Video API overview to get a better understanding of how aRoom is modeled, especially Stream and Subscription.
Major 🔑 about Subscriptions
In order to display media from a remote stream you need to subscribe to it.
It’s important to understand that your Room doesn’t automatically subscribe to a remote stream being published. It’s your choice to decide whether to subscribe to a given stream.
Subscribing to a stream
So let’s say the app your building has two users - let’s them call them Alice and Bob. First, Alice joins theRoom and starts publishing a stream with audio from her microhone and video from her camera like this:
NOTE: The app on Alice’s device runs the following code…
Handling remote streams that are already publishing in the Room
After you connect to a Room there may be remote participants already in theRoom who are publishing streams in the Room.
To deal with that use the onStreamPublished event:
Disconnecting from a Room
To disconect from a room do:Room all Remote Participant’s will be notified that you’ve left the Room because the Room.onParticipantLeft event will fire on their Room instance.
Fax
Getting Started
Source: https://developers.telnyx.com/docs/programmable-fax/get-started.md
Introduction
Welcome to Telnyx Programmable Fax, a powerful tool that allows you to send and receive faxes seamlessly through HTTP endpoints. This guide will introduce you to the basics of setting up and using the Programmable Fax API.Prerequisites
Before you begin, you’ll need to:- Set up a Telnyx account. Sign up here if you haven’t already.
- Obtain a phone number and create a Programmable Fax Application following our Quickstart guide.
- Generate a Telnyx V2 API Authentication key via the Telnyx Mission Control Portal.
Core Concepts
- Programmable Fax Application: Configure inbound traffic and authentication for your phone numbers.
- Outbound Voice Profile: Manage outbound traffic, billing, and allowed destinations.
- Webhooks: HTTP callbacks that notify your server about fax events.
Hello World Example
Send Your First Fax Using cURL:- Authenticate Your Request: Include your API key in the header for authentication.
- Specify Fax Details: Provide the media URL, connection ID (use your application id), and the ‘to’ and ‘from’ fax numbers in E.164 format.
- Send the Fax:
- Verify the Response: Check for an HTTP 202 response indicating successful fax initiation
Next Steps
- Explore advanced features like receiving faxes and detailed webhook management.
- Check out our detailed tutorials for comprehensive guidance.
Additional Resources
- Visit our API documentation for in-depth understanding.
- Join our community forums for support and discussion
Feedback
We value your feedback. If you have questions or need help troubleshooting, our support team is ready to assist. Contact us here.Glossary
- Programmable Fax Application: A configuration within the Telnyx platform used to manage inbound and outbound fax traffic. It includes settings for authentication and handling of fax transmissions.
- Outbound Voice Profile: A setting in Telnyx that allows users to initiate outbound traffic, including faxes. It includes configurations for billing, traffic management, and permitted destinations.
- Fax_id: A unique identifier assigned to each fax transmission. It is used to track and manage specific fax communications within the Telnyx system.
- Media_url: The URL pointing to the document you wish to fax, typically in PDF format. This URL is included in the fax command to specify the fax content.
- Connection_id: An identifier for your specific application or connection within Telnyx, used to route the fax correctly and associate it with your account.
- E.164 Format: An internationally-recognized format for phone numbers, used in specifying the ‘to’ and ‘from’ fields in fax commands.
- Failure_reason: A field in the webhook payload that provides the reason for a fax’s failure, helping in troubleshooting and understanding delivery issues.
- Ngrok: A tunneling tool used to expose a local server to the internet, often used for testing webhook endpoints in development environments.
- cURL: A command-line tool used for sending requests to URLs, commonly used for interacting with APIs like Telnyx’s Programmable Fax API.
Quickstart
Source: https://developers.telnyx.com/docs/programmable-fax/quickstart.mdIn this guide, you’ll learn how to get started with Telnyx Programmable Fax within the Telnyx Portal. Just follow these simple steps:
- Sign up for a Telnyx Account.
- Create a Programmable Fax Application to configure how you connect your calls.
- Buy or port a Phone Number.
- Assign your number to the Programmable Fax Application.
- Create an Outbound Voice Profile to configure your outbound call settings and assign it to your Programmable Fax Application.
Step 1: Sign Up for a Telnyx Mission Control Portal account
Head to telnyx.com/sign-up to sign up for your free Telnyx account. It’ll give you access to our Mission Control Portal where you can buy phone numbers, set up and manage Programmable Fax Applications, and more.Step 2: Create a programmable fax application in the Telnyx portal
- Select “Programmable Fax” in the left-hand navigation menu.
- Click “Add New App”.
- For testing purposes, you can set the webhook URL using an endpoint you create at https://hookbin.com .
Step 3: Buy a phone number
You can search for, buy, and provision new numbers, or port existing numbers - all within the Numbers section of the Telnyx Portal . Simply click on “Numbers”, then either “Search & Buy Numbers” or “Port Numbers” and follow the prompts.You can also do this programmatically via our RESTful API. Check out our documentation for number searching and ordering.
Step 4: Assign your phone number to the programmable fax application
Once your number has been purchased or ported, assign it to the Programmable Fax Application that you created in step 2. You can do this via the My Numbers section of the Portal.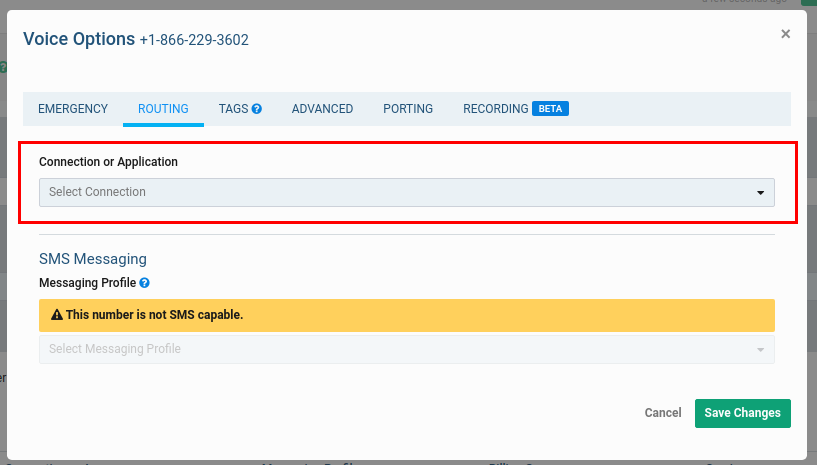
Step 5: Create an outbound voice profile (not required for Inbound)
To initiate an outbound fax, you must create an Outbound Voice Profile and assign your Programmable Fax Application to it. Select “Outbound Voice Profiles” on the left-hand navigation menu, click “+Add New Profile” and set up your profile name. Add the Programmable Fax Application you just created above, the traffic type, the service plan, and your desired billing method.You can also do this programmatically via our RESTful API. Check out our documentation for Outbound Voice Profiles.That’s it. You’re all set to start integrating Telnyx with your applications.
Where to next?
Head over to our tutorials to learn how to send a fax and receive a fax via API. After you setup your development environment you can also dive deeper into sending commands and receiving webhooks.Receiving Webhooks
Source: https://developers.telnyx.com/docs/programmable-fax/receiving-webhooks.mdWhen you send a Programmable Fax command and receive a successful response (i.e. 200 OK), you can expect to receive a webhook. The webhook will be delivered to the primary URL specified on the Application associated with the call. If that URL does not resolve, or your application returns a non 200 OK response, the webhook will be delivered to the failover URL, if one has been specified. In order to minimize webhook delivery time, Telnyx:
- does not enforce the order in which webhooks are delivered
- retries webhook delivery if your application does not respond within a certain time threshold.
- out-of-order webhooks
- simultaneous (or near simultaneous) webhooks
- duplicate webhooks
command_ids within 60 seconds will be ignored.
Example: Receiving a webhook from an outbound fax
When you place an outbound fax, you will receive a number of webhooks indicating the current status of the fax. The first webhook you will receive will have A queued status indicating that Telnyx successfully received the request to send the fax.Example: Receiving a webhook on successful fax delivery
Example: Receiving a webhook on failed fax delivery
Possible failure reasons
Inspect thefailure_reason field in webhook’s payload to debug failed deliveries of your faxes. The possible failure reasons are:
account_disabledconnection_channel_limit_exceededdestination_invaliddestination_not_in_countries_whitelistdestination_not_in_service_plandestination_unreachablefax_initial_communication_timeoutfax_signaling_errorinvalid_ecm_response_from_receiverno_outbound_profileoutbound_profile_channel_limit_exceededoutbound_profile_daily_spend_limit_exceededreceiver_call_droppedreceiver_communication_errorreceiver_declinereceiver_incompatible_destinationreceiver_invalid_number_formatreceiver_no_answerreceiver_no_responsereceiver_recovery_on_timer_expirereceiver_unallocated_numberservice_unavailableunverified_destination_not_allowedunverified_origination_numberuser_busyuser_channel_limit_exceeded
Sending Commands
Source: https://developers.telnyx.com/docs/programmable-fax/sending-commands.mdA Programmable Fax API command is sent with a fax_id. The fax_id allows a user to communicate to Telnyx the fax the user wants to take an action on. The Telnys Programmable Fax API supports PDF files. To initiate sending the fax, we need to send the request to the Telnyx Programmable Fax API endpoint https://api.telnyx.com/v2/faxes.
Authentication
With the request we need to send additional parameters containing authentication information so Telnyx knows which account to send the fax from and information about the destination and file being sent. HEADER DESCRIPTION media_url Authorization: Bearer YOUR_API_KEY connection_id Authorization: Bearer YOUR_API_KEY to Authorization: Bearer YOUR_API_KEY from Authorization: Bearer YOUR_API_KEY Authorization: Bearer The prefix to your API V2 key created in Step 2.Available commands and their expected Webhooks
Telnyx sends webhooks to update on the status of Programmable Fax. Webhooks will also be sent in response to requests to list and delete faxes. COMMAND ASSOCIATED WEBHOOKS Send a fax fax.queued fax.media.processed fax.sending.started fax.delivered fax.failedResponse when sending command
When you send a Programmable Fax API Command, you will immediately receive an http response. Responses include, but are not limited to: HTTP STATUS CODE MESSAGE DESCRIPTION 202 OK The request succeeded. 403 Forbidden The request was valid, however the user is not authorized to perform this action. 404 Not Found The requested resource could not be found. 422 Invalid Parameters The request has invalid parameters.Example: Sending commands
To send a fax, send a POST request to the https://api.telnyx.com/v2/faxes endpoint as shown in the example below.WITH A API V2 KEY
Send a fax via API
Source: https://developers.telnyx.com/docs/programmable-fax/send-a-fax-api.mdThe Telnyx Programmable Fax API lets you send, receive, and manage faxes through a set of easy-to-use HTTP endpoints. In this guide, you’ll learn how to send a fax using the Programmable Fax API in four simple steps.
Step 1: Setting up with Telnyx
Setup a Telnyx account, phone number, and programmable fax application
First, follow our Quickstart guide to create a Telnyx account, phone number, and Fax Application.Step 2: API authentication
If you already have a Telnyx V2 API Authentication key, skip to Step 3.
- In the Telnyx Mission Control Portal , in the left menu bar navigate to ” API Keys ”.
- Ensure, API V2 is selected in the horizontal menu bar.
- Click “Create API key”
- Copy the API key and save it somewhere safe.
Step 3: Send a PDF with the programmable fax API using curl
The Telnyx Programmable Fax API supports PDF files. To initiate sending a fax, we need to send the request to the Telnyx Programmable Fax API endpointhttps://api.telnyx.com/v2/faxes.
We need to send additional parameters containing authentication information with the request, so Telnyx knows which account to send the fax from and information about the destination and file being sent.
Header
Description
media_url
The URL of the PDF used for the fax’s media.
connection_id
The app ID or connection ID to send the fax with.
to
The fax enabled phone number (in E.164 format), or SIP URI, the fax will be sent to.
from
The phone number, in E.164 format, the fax will be sent from.
Authorizaton: Bearer
The prefix to your API V2 key created in Step 2.
Now that we know what we need to include in our request, we can use a number of different methods to structure and send it. In this example, we are going to use curl straight from the command line. You can also use a client such as
Postman
to structure your request.
Step 4: Verify HTTP response and receive webhooks
If you have successfully structured your command and the fax has begun sending, the Programmable Fax API will respond with HTTP 202. If you do not receive a HTTP 202 response, double-check your request and try again. Explanations of other response codes can be found in our API reference. Once the request to send the fax has been successfullly received by Telnyx, you should begin receiving a series of webhooks to the URL that you specified in your Fax Application. The webhooks you should receive are:fax.queuedfax.media.processedfax.sending.startedfax.deliveredfax.failed
fax.delivered webhook, your fax has been delivered to its destinaion.
Webhook examples
On successful delivery
On failed delivery
Possible failure reasons
Inspect thefailure_reason field in webhook’s payload to debug failed deliveries of your faxes. The possible failure reasons are:
account_disabledconnection_channel_limit_exceededdestination_invaliddestination_not_in_countries_whitelistdestination_not_in_service_plandestination_unreachablefax_initial_communication_timeoutfax_signaling_errorinvalid_ecm_response_from_receiverno_outbound_profileoutbound_profile_channel_limit_exceededoutbound_profile_daily_spend_limit_exceededreceiver_call_droppedreceiver_communication_errorreceiver_declinereceiver_incompatible_destinationreceiver_invalid_number_formatreceiver_no_answerreceiver_no_responsereceiver_recovery_on_timer_expirereceiver_unallocated_numberservice_unavailableuser_busyuser_channel_limit_exceeded
Where to next?
Continue to our next tutorial to learn how to receive inbound faxes via API.Receive a fax via API
Source: https://developers.telnyx.com/docs/programmable-fax/receive-a-fax-api.mdThe Telnyx Programmable Fax API lets you send, receive and manage faxes through a set of easy-to-use HTTP endpoints. In this guide, you’ll learn how to handle receiving a fax using the Programmable Fax API.
Step 1: Setup with Telnyx
Setup a Telnyx account, phone number, and programmable fax application
First, follow our Quickstart guide to create a Telnyx account, phone number, and Fax Application. The phone number that you select and associate with the Programmable Fax Application will receive incoming fax calls. You can also port an existing number to Telnyx and use it for Programmable Fax.Step 2: Receiving Webhooks
In order for the webhooks in this tutorial to work, Telnyx must be able to send your web application an HTTP request over the Internet. That means your application needs to have a URL or IP address that Telnyx can reach. Telnyx sends webhooks to the URL or IP address to notify your application of incoming faxes. For the purpose of this tutorial, we’re using ngrok , a popular tunneling tool used to expose a locally running application to the internet. ngrok gives you a public URL for a local port on your development machine, which you can use to configure your Telnyx webhooks as described above. Download and install ngrok, then use it at the command line to create a tunnel to whatever port your web application is running on. For example, this command will create a public URL for a web application listening on port 3000.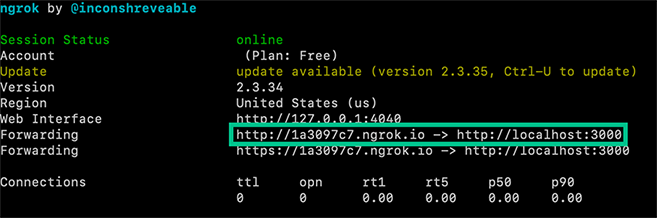
Example Webhooks
If you have set everything up correctly, any time an inbound fax is received you can expect to receive the following webhooks: Webhook Name Description fax.receiving.started The fax has begun transmitting to Telnyx successfully. fax.media.processing.started Telnyx has received the fax and is generating the digital PDF file. fax.received The PDF has been generated and the file is ready to be downloaded. fax.failed Transmission of the fax failed. Check the <code>failure_reason</code> for more details.Fax has begun transmitting to Telnyx
Fax transmission is complete and Telnyx is converting to PDF
PDF has been generated and is ready for download
The media_url field contains a signed AWS link to a PDF of the received fax. This URL is valid for 10 minutes before the file is no longer accessible so be sure to download the file if you wish to keep it!Uh oh, something has gone wrong and the fax failed
Inbound faxes can fail for a variety of reasons. Some of the most common reasons are that the sending party hung up before the fax was finished transmitting or didn’t send anything at all.Where to next?
Go back to our previous tutorial to learn how to send outbound faxes via API.Email to fax
Source: https://developers.telnyx.com/docs/programmable-fax/email-to-fax.md⏱ 60 minutes build time. __🧰 Clone the sample application from our GitHub repo __ In this tutorial, you’ll learn how to use the Telnyx Fax API to receieve faxes to your email in Python. Our Programmable Fax API, combined with our Numbers API, provides everything you need to build a robust call tracking application: The Numbers API enables you to search the Telnyx phone number inventory in real time; filtering by Area Code, City/State, and more to find the perfect local number for your use-case. Call Control enables you to quickly setup dynamic forwarding numbers, toggle dual-channel recording, join/leave dynamic conferences, and pull post-call analytics. By following this tutorial, you’ll be able to:
- Configure a Telnyx portal account.
- Set up a Telnyx Fax profile and an outbound voice profile.
- How to send a fax to your email using Telnyx.
- How to send a fax using your email and to Telnyx Fax profile.
What you’ll need to get started with email to fax
- A Telnyx account- take a minute to sign up to our self-service portal.
- A Telnyx phone number that’s enabled with a Telnyx Fax Appliction and a Telnyx Outbound Voice profile .
- Ability to receive webhooks (with something like ngrok)
- Python and PIP installed
- An AWS Account setup with proper profiles and groups with IAM for S3. Check out the Quickstart for more information.
- Finally you’ll need a Mailgun account . If you’re planning on using this guide to build an email to fax application you’ll need an account with the ability to setup inbound routes .
Create a Telnyx Mission Control Portal account
To get started, you’ll need to create an account . Verify your email address and you can log into the Mission Control Portal to get started.Usage
The following environmental variables need to be set: Variable Description TELNYX_API_KEY Your Telnyx API Key TELNYX_PUBLIC_KEY Telnyx Public Key TELNYX_S3_BUCKET The name of the bucket to upload the media attachments TELNYX_FAX_CONNECTION_ID The connection ID for your Fax Applications MAILGUN_API_KEY Your Mailgun API Key MAILGUN_DOMAIN Your Mailgun Domain. PORT Defaults to 8000 The port the app will be served.env file
This app uses the excellent python-dotenv package to manage environment variables. Make a copy of .env.sample and save as .env and update the variables to match your creds. TELNYX_PUBLIC_KEY=“+kWXUag92mcUMFQopVlff7ctD/m2S/IoXv+AlI1/5a0=” TELNYX_API_KEY=“KEYI” TELNYX_S3_BUCKET=telnyx-mms-demo TELNYX_FAX_CONNECTION_ID=36092346987 MAILGUN_API_KEY=“123-432-123” MAILGUN_DOMAIN=“sandbox367c5ec1512d458e95f5e5c60f5fe97a.mailgun.org” PORT=8000Callback URLs for Telnyx application
Callback Type URL Fax Callbacks{ngrok-url}/faxes
Email Callbacks
{ngrok-url}/email/inbound
Install
Run the following commands to get started: $ git clone https://github.com/team-telnyx/demo-python-telnyx.gitNgrok
This application is served on the port defined in the runtime environment (or in the .env file). Be sure to launch ngrok for that port: ./ngrok http 8000 ngrok by @inconshreveable (Ctrl+C to quit) Session Status online Account Little Bobby Tables (Plan: Free) Version 2.3.35 Region United States (us) Web Interface http://127.0.0.1:4040 Forwarding http://your-url.ngrok.io -> http://localhost:8000 Forwarding https://your-url.ngrok.io -> http://localhost:8000 Connections ttl opn rt1 rt5 p50 p90 0 0 0.00 0.00 0.00 0.00 At this point you can point your application to generated ngrok URL + path: (Example:http://{your-url}.ngrok.io/faxes).
Run
High level code overview
Receiving fax, sending email
- Receive the webhook from Telnyx indicating fax is incoming
- We only only care about the fax.received webhook for inbound faxes
- Extract the to/from and other information about the fax
- Download the attachment and save locally
- Lookup the association between phone_number and email
- Create and send an email via Mailgun with downloaded media as an attachment
Sending fax
- Receive webhook from mailgun for incoming email
- Extract the prefix of the email (19198675309@MAILGUN_DOMAIN.com, we want 19198675309) and prepend the +
- Lookup the association between email and phone_number to determine the from phone number.
- Save the first attachment locally
- Upload the attachment to S3
- Create and send a fax to the phone number extracted above
Update “DB”
The app as provided uses a dumb-hard-coded database to minimize dependencies for the sake of examples. There is an in memory database defined at the top that associates an email to a Telnyx number.- phone_number is a Telnyx phone number
- email is the email to associate with that phone number
Receiving faxes
Sending faxes
Launch the app and update callbacks
Start the server python app.py When you are able to run the server locally, the final step involves making your application accessible from the Internet. So far, we’ve set up a local web server. This is typically not accessible from the public internet, making testing inbound requests to web applications difficult. The best workaround is a tunneling service. They come with client software that runs on your computer and opens an outgoing permanent connection to a publicly available server in a data center. Then, they assign a public URL (typically on a random or custom subdomain) on that server to your account. The public server acts as a proxy that accepts incoming connections to your URL, forwards (tunnels) them through the already established connection and sends them to the local web server as if they originated from the same machine. The most popular tunneling tool is ngrok. Check out the ngrok setup walkthrough to set it up on your computer and start receiving webhooks from inbound faxes to your newly created application. Once you’ve set up ngrok or another tunneling service you can add the public proxy URL to your Inbound Settings in the Mission Control Portal. To do this, click the edit symbol [✎] next to your Fax Profile. In the “Inbound Settings” > “Webhook URL” field, paste the forwarding address from ngrok into the Webhook URL field. Add faxes to the end of the URL to direct the request to the webhook endpoint in your server. For now you’ll leave “Failover URL” blank, but if you’d like to have Telnyx resend the webhook in the case where sending to the Webhook URL fails, you can specify an alternate address in this field. Once everything is setup, you should now be able to:- Fax your phone number and receive an email
- Email
{19198675309}@domain.coman attachment to send a fax to{19198675309}
Fax follow-Ons
Now that you’ve successfully sent a fax to your email and phone number, you can explore more fax features and discover ideas to build new applications. Our developer Slack community is full of Python developers like you - be sure to join to see what your fellow developers are building!API Reference (Other APIs)
AutoRechargePreferences
- List auto recharge preferences: Returns the payment auto recharge preferences.
- Update auto recharge preferences: Update payment auto recharge preferences.
Notifications
- List notification channels: List notification channels.
- Create a notification channel: Create a notification channel.
- Get a notification channel: Get a notification channel.
- Update a notification channel: Update a notification channel.
- Delete a notification channel: Delete a notification channel.
- List all Notifications Events Conditions: Returns a list of your notifications events conditions.
- List all Notifications Events: Returns a list of your notifications events.
- List all Notifications Profiles: Returns a list of your notifications profiles.
- Create a notification profile: Create a notification profile.
- Get a notification profile: Get a notification profile.
- Update a notification profile: Update a notification profile.
- Delete a notification profile: Delete a notification profile.
- List notification settings: List notification settings.
- Add a Notification Setting: Add a notification setting.
- Get a notification setting: Get a notification setting.
- Delete a notification setting: Delete a notification setting.
Addresses
- List all addresses: Returns a list of your addresses.
- Creates an address: Creates an address.
- Retrieve an address: Retrieves the details of an existing address.
- Deletes an address: Deletes an existing address.
- Accepts this address suggestion as a new emergency address for Operator Connect and finishes the uploads of the numbers associated with it to Microsoft.
- Validate an address: Validates an address for emergency services.
Billing
Authentication Providers
- List all SSO authentication providers: Returns a list of your SSO authentication providers.
- Creates an authentication provider: Creates an authentication provider.
- Retrieve an authentication provider: Retrieves the details of an existing authentication provider.
- Update an authentication provider: Updates settings of an existing authentication provider.
- Deletes an authentication provider: Deletes an existing authentication provider.
IP Addresses
- List all Access IP Addresses
- Create new Access IP Address
- Retrieve an access IP address
- Delete access IP address
IP Ranges
Managed Accounts
- Lists accounts managed by the current user.: Lists the accounts managed by the current user. Users need to be explictly approved by Telnyx in order to become manager accounts.
- Create a new managed account.: Create a new managed account owned by the authenticated user. You need to be explictly approved by Telnyx in order to become a manager account.
- Retrieve a managed account: Retrieves the details of a single managed account.
- Update a managed account: Update a single managed account.
- Disables a managed account: Disables a managed account, forbidding it to use Telnyx services, including sending or receiving phone calls and SMS messages. Ongoing phone calls will not be…
- Enables a managed account: Enables a managed account and its sub-users to use Telnyx services.
- Update the amount of allocatable global outbound channels allocated to a specific managed account.: Update the amount of allocatable global outbound channels allocated to a specific managed account.
- Display information about allocatable global outbound channels for the current user.: Display information about allocatable global outbound channels for the current user. Only usable by account managers.
Organization Users
- List organization users: Returns a list of the users in your organization.
- Get organization user: Returns a user in your organization.
- Delete organization user: Deletes a user in your organization.
- Get organization users groups report: Returns a report of all users in your organization with their group memberships. This endpoint returns all users without pagination and always includes group i…
Billing Groups
- List all billing groups
- Create a billing group
- Get a billing group
- Update a billing group
- Delete a billing group
Detail Records
- Search detail records: Search for any detail record across the Telnyx Platform
MDR Detailed Reports
- Get all MDR detailed report requests: Retrieves all MDR detailed report requests for the authenticated user
- Create a new MDR detailed report request: Creates a new MDR detailed report request with the specified filters
- Get a specific MDR detailed report request: Retrieves a specific MDR detailed report request by ID
- Delete a MDR detailed report request: Deletes a specific MDR detailed report request by ID
CDR Reports
- Get all CDR report requests: Retrieves all CDR report requests for the authenticated user
- Create a new CDR report request: Creates a new CDR report request with the specified filters
- Get a specific CDR report request: Retrieves a specific CDR report request by ID
- Delete a CDR report request: Deletes a specific CDR report request by ID
- Get available CDR report fields: Retrieves all available fields that can be used in CDR reports
MDR Usage Reports
- List MDR usage reports: Fetch all previous requests for MDR usage reports.
- Create a new legacy usage V2 MDR report request: Creates a new legacy usage V2 MDR report request with the specified filters
- Get an MDR usage report: Fetch single MDR usage report by id.
- Delete a V2 legacy usage MDR report request: Deletes a specific V2 legacy usage MDR report request by ID
- Fetch all Messaging usage reports: Fetch all messaging usage reports. Usage reports are aggregated messaging data for specified time period and breakdown
- Create MDR Usage Report: Submit request for new new messaging usage report. This endpoint will pull and aggregate messaging data in specified time period.
- Retrieve messaging report: Fetch a single messaging usage report by id
- Delete MDR Usage Report: Delete messaging usage report by id
- Generate and fetch MDR Usage Report: Generate and fetch messaging usage report synchronously. This endpoint will both generate and fetch the messaging report over a specified time period. No polli…
Telco Data Usage Reports
- List telco data usage reports: Retrieve a paginated list of telco data usage reports
- Submit telco data usage report: Submit a new telco data usage report
- Get telco data usage report by ID: Retrieve a specific telco data usage report by its ID
- Delete telco data usage report: Delete a specific telco data usage report by its ID
Speech to text Usage Reports
- Get speech to text usage report: Generate and fetch speech to text usage report synchronously. This endpoint will both generate and fetch the speech to text report over a specified time period.
CDR Usage Reports
- List CDR usage reports: Fetch all previous requests for cdr usage reports.
- Create a new legacy usage V2 CDR report request: Creates a new legacy usage V2 CDR report request with the specified filters
- Get a CDR usage report: Fetch single cdr usage report by id.
- Delete a V2 legacy usage CDR report request: Deletes a specific V2 legacy usage CDR report request by ID
- Generates and fetches CDR Usage Reports: Generate and fetch voice usage report synchronously. This endpoint will both generate and fetch the voice report over a specified time period. No polling is ne…
Usage Reports (BETA)
- Get Telnyx product usage data (BETA): Get Telnyx usage data by product, broken out by the specified dimensions
- Get Usage Reports query options (BETA): Get the Usage Reports options for querying usage, including the products available and their respective metrics and dimensions
Speech to Text Batch Reports
- Get all Speech to Text batch report requests: Retrieves all Speech to Text batch report requests for the authenticated user
- Create a new Speech to Text batch report request: Creates a new Speech to Text batch report request with the specified filters
- Get a specific Speech to Text batch report request: Retrieves a specific Speech to Text batch report request by ID
- Delete a Speech to Text batch report request: Deletes a specific Speech to Text batch report request by ID
MDR Detail Reports
- Fetch all Mdr records: Fetch all Mdr records
WDR Detail Reports
- Fetches all Wdr records: Fetch all Wdr records
Session Analysis
- Get metadata overview: Returns all available record types and supported query parameters for session analysis.
- Get record type metadata: Returns detailed metadata for a specific record type, including relationships and examples.
- Get session analysis: Retrieves a full session analysis tree for a given event, including costs, child events, and product linkages.
Webhooks
- List webhook deliveries: Lists webhook_deliveries for the authenticated user
- Find webhook_delivery details by ID: Provides webhook_delivery debug data, such as timestamps, delivery status and attempts.
Audit Logs
- List Audit Logs: Retrieve a list of audit log entries. Audit logs are a best-effort, eventually consistent record of significant account-related changes.
User Tags
- List User Tags: List all user tags.
UserAddresses
- List all user addresses: Returns a list of your user addresses.
- Creates a user address: Creates a user address.
- Retrieve a user address: Retrieves the details of an existing user address.
Integration Secrets
- List integration secrets: Retrieve a list of all integration secrets configured by the user.
- Create a secret: Create a new secret with an associated identifier that can be used to securely integrate with other services.
- Delete an integration secret: Delete an integration secret given its ID.
Room Compositions
- View a list of room compositions.
- Create a room composition.: Asynchronously create a room composition.
- View a room composition.
- Delete a room composition.: Synchronously delete a room composition.
Room Participants
Room Recordings
- View a list of room recordings.
- Delete several room recordings in a bulk.
- View a room recording.
- Delete a room recording.: Synchronously delete a Room Recording.
Room Sessions
- View a list of room sessions.
- View a room session.
- End a room session.: Note: this will also kick all participants currently present in the room
- Kick participants from a room session.
- Mute participants in room session.
- Unmute participants in room session.
- View a list of room participants.
Rooms
- View a list of rooms.
- Create a room.: Synchronously create a Room.
- View a room.
- Update a room.: Synchronously update a Room.
- Delete a room.: Synchronously delete a Room. Participants from that room will be kicked out, they won’t be able to join that room anymore, and you won’t be charged anymore for…
- View a list of room sessions.
Rooms Client Tokens
- Create Client Token to join a room.: Synchronously create an Client Token to join a Room. Client Token is necessary to join a Telnyx Room. Client Token will expire after
token_ttl_secs, a Refres… - Refresh Client Token to join a room.: Synchronously refresh an Client Token to join a Room. Client Token is necessary to join a Telnyx Room. Client Token will expire after
token_ttl_secs.
SETI Observability
- Retrieve Black Box Test Results: Returns the results of the various black box tests
Programmable Fax Applications
- List all Fax Applications: This endpoint returns a list of your Fax Applications inside the ‘data’ attribute of the response. You can adjust which applications are listed by using filter…
- Creates a Fax Application: Creates a new Fax Application based on the parameters sent in the request. The application name and webhook URL are required. Once created, you can assign phon…
- Retrieve a Fax Application: Return the details of an existing Fax Application inside the ‘data’ attribute of the response.
- Update a Fax Application: Updates settings of an existing Fax Application based on the parameters of the request.
- Deletes a Fax Application: Permanently deletes a Fax Application. Deletion may be prevented if the application is in use by phone numbers.
Programmable Fax Commands
- View a list of faxes
- Send a fax: Send a fax. Files have size limits and page count limit validations. If a file is bigger than 50MB or has more than 350 pages it will fail with `file_size_limi…
- View a fax
- Delete a fax
- Cancel a fax: Cancel the outbound fax that is in one of the following states:
queued,media.processed,originatedorsending - Refresh a fax: Refreshes the inbound fax’s media_url when it has expired
Callbacks
OAuth Discovery
- Authorization server metadata: OAuth 2.0 Authorization Server Metadata (RFC 8414)
- Protected resource metadata: OAuth 2.0 Protected Resource Metadata for resource discovery
OAuth Protocol
- OAuth authorization endpoint: OAuth 2.0 authorization endpoint for the authorization code flow
- Get OAuth consent token: Retrieve details about an OAuth consent token
- Token introspection: Introspect an OAuth access token to check its validity and metadata
- JSON Web Key Set: Retrieve the JSON Web Key Set for token verification
- Dynamic client registration: Register a new OAuth client dynamically (RFC 7591)
- OAuth token endpoint: Exchange authorization code, client credentials, or refresh token for access token
OAuth Clients
- List OAuth clients: Retrieve a paginated list of OAuth clients for the authenticated user
- Create OAuth client: Create a new OAuth client
- Get OAuth client: Retrieve a single OAuth client by ID
- Update OAuth client: Update an existing OAuth client
- Delete OAuth client: Delete an OAuth client
OAuth Grants
- List OAuth grants: Retrieve a paginated list of OAuth grants for the authenticated user
- Get OAuth grant: Retrieve a single OAuth grant by ID
- Revoke OAuth grant: Revoke an OAuth grant